There is a specific kind of magic that happens when you pull a tray of freshly baked shortcrust sugar cookies out of the oven. But the real transformation begins when you apply a professional-grade sugar cookie glaze. This isn’t just a simple topping; it is a glass-like finish that turns a humble biscuit into a work of edible art.
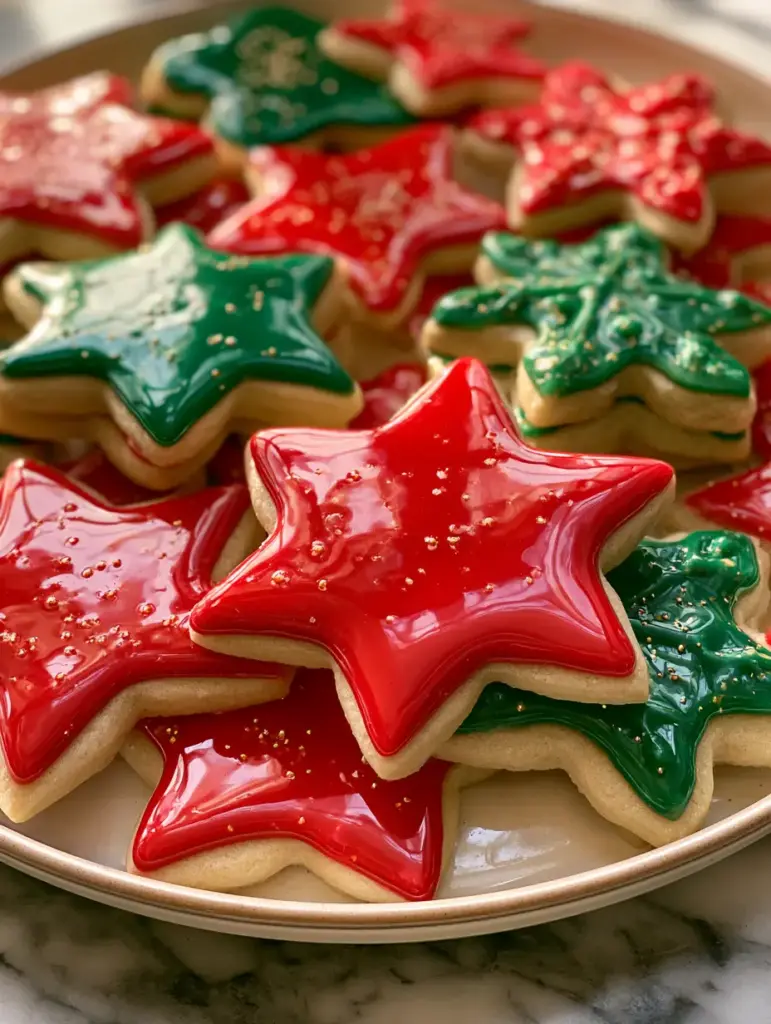
If you have ever admired those handheld smartphone photos of vibrant red and green icing reflecting soft natural light, you know the visual impact of a perfect glaze. The way the light catches the smooth, shiny surface of a star or snowflake-shaped cookie is what separates amateur baking from a professional holiday display. This recipe is designed to give you that exact “glass-like” texture that dries hard enough for stacking.
Achieving a mirror-finish sugar cookie glaze requires more than just mixing sugar and water. It involves a delicate balance of viscosity and surface tension. In this guide, we will explore the science of corn syrup for shine, the necessity of gel coloring for vibrancy, and the techniques required to ensure your metallic gold sprinkles stay perfectly in place on a marble countertop-worthy treat.

Why This Is the Ultimate Glossy Cookie Finish
- Professional High-Shine Finish: Unlike standard buttercream or simple icing, this sugar cookie glaze uses light corn syrup to create a reflective, glass-like surface that stays glossy even after it dries.
- Stackable & Durable: Within 24 hours, this glaze sets into a firm, dry shell. This allows you to stack your cookies in tins without ruining the intricate designs or vibrant colors.
- Vibrant Pigment Control: By utilizing gel food coloring instead of liquid drops, we achieve deep, festive reds and greens without thinning the consistency of the icing.
- Perfect Flow: The recipe is calibrated for the “10-second rule,” ensuring the glaze is thick enough to stay on the cookie but thin enough to self-level into a perfectly smooth surface.
The Anatomy of a Perfect Sugar Cookie Glaze
To achieve the visual result described in our blueprint—specifically that thick, glass-like texture—we must use high-quality ingredients. Each component serves a structural purpose in the chemistry of the glaze.
Powdered Sugar (Confectioners’ Sugar): 2 cups (240g). This provides the structural base. Always sift your sugar to ensure there are zero clumps, which would otherwise ruin the “macro focus” smoothness of the final cookie.
Whole Milk: 2 tablespoons (30ml). This acts as the primary liquid to dissolve the sugar. While you can use water, whole milk provides a slightly creamier opacity that makes the red and green colors pop against the white shortcrust base.
Light Corn Syrup: 2 tablespoons (30ml). This is the “invisible” powerhouse ingredient. It is responsible for the incredible shine and the “bendable” quality that prevents the glaze from cracking when you bite into the cookie.
Vanilla Extract: 1/2 teaspoon (2.5ml). A clear vanilla extract is preferred if you are making a pure white base, but standard extract works perfectly for colored glazes. It adds the essential aromatic depth that balances the sweetness.
Gel Food Coloring: For those vibrant festive hues, gel is non-negotiable. Liquid coloring adds too much moisture, which can lead to “color bleed” or a runny glaze that won’t hold its shape on your stars and snowflakes.
Decorative Elements: Metallic gold sprinkles and white nonpareils. These should be applied while the glaze is still “wet” to the touch but has settled for about 30 seconds to prevent them from sinking to the bottom of the glaze layer.
Essential Equipment for a Marble-Countertop Result
To recreate the handheld smartphone photo look, you need tools that allow for precision and cleanliness. A messy application will never achieve that “perfectly smooth” look seen in high-end food photography.
You will need a set of fine-mesh sifters to ensure your sugar is ultra-fine. Small glass mixing bowls are ideal for dividing the glaze into different colors. For application, use squeeze bottles or piping bags with small round tips. A toothpick or “scribe tool” is also essential for popping tiny air bubbles that may rise to the surface of your sugar cookie glaze.
If you are looking for more dessert inspiration to fill your holiday dessert table, consider pairing these with classic raspberry jam cookies or even a decadent pistachio kunafa chocolate cake for a truly global dessert spread.
Step-by-Step Guide to the Perfect Glass-Like Glaze
1. Sifting and Preparing the Base
Begin by sifting your 2 cups (240g) of powdered sugar into a medium bowl. Do not skip this step; even the smallest lump will be magnified once the glaze dries. Add the milk and vanilla extract, whisking slowly by hand until a thick paste forms.
2. The “Shine” Integration
Add the 2 tablespoons (30ml) of light corn syrup. Whisk until the mixture is completely homogeneous. At this stage, you should see a significant change in the visual texture—it will transition from a dull matte paste to a glossy, light-reflecting liquid. This is the hallmark of a high-quality sugar cookie glaze.
3. Testing the Consistency
Lift your whisk and let the glaze drizzle back into the bowl. It should take exactly 10 to 12 seconds for the ribbon of glaze to completely disappear into the surface. If it disappears faster, add a tablespoon more sugar. If it stays visible longer, add a few drops of milk.
4. Pigmentation and Coloring
Divide the glaze into smaller bowls. Using a toothpick, add a tiny amount of red or green gel coloring. Stir slowly to avoid incorporating air bubbles. For the vibrant red and green icing seen in festive shapes, continue adding color until the hue is deep and saturated. If you are also making soft lemon sugar cookies, you might want to keep a portion of the glaze white or a pale yellow.
5. Dipping and Flooding Techniques
For the “smooth and shiny” look, you can either dip the face of the shortcrust sugar cookies directly into the bowl or use a piping bag to outline and flood. If dipping, allow the excess to drip off before quickly flipping the cookie upright. Use your scribe tool to pull the glaze to the edges of your stars and snowflakes.
6. The Final Flourish
While the glaze is still wet, carefully drop your metallic gold sprinkles and white nonpareils onto the surface. The goal is a macro focus on the thick, glass-like texture, so don’t over-decorate—let the shine of the sugar cookie glaze be the star.
Expert Tips for a Flawless Finish
- Pop the Bubbles: After mixing your colors, let the bowls sit for 10 minutes. This allows air bubbles to rise to the surface where you can pop them with a toothpick before piping.
- The Drying Environment: Place your decorated cookies on a flat tray in a cool, dry area. Avoid the refrigerator, as the humidity can dull the shine of the corn syrup.
- Achieving “Hard and Dry” Status: For stackable cookies, patience is key. While the glaze may look dry after 4 hours, it truly needs 24 hours to crystallize into a hard shell.
- Preventing Color Bleed: If you are placing red glaze next to white glaze, ensure the first color has “crusted over” (about 30 minutes) before adding the second color.
Storage, Shelf Life, and Stacking
Once your sugar cookie glaze has fully hardened, these cookies are incredibly durable. You can stack them between layers of parchment paper in an airtight container. They will remain fresh at room temperature for up to one week.
For long-term storage, you can freeze the glazed cookies. Ensure they are completely dry, then wrap the container in plastic wrap. When thawing, do not open the container until it has reached room temperature; this prevents condensation from forming on the glossy surface and causing “pitting” in the glaze.
Creative Pairings for Your Cookie Tray
A tray of glossy sugar cookies looks beautiful, but it’s even better when surrounded by a variety of textures and flavors. For a sophisticated holiday spread, serve these cookies alongside rich brownie cheesecake bites or perhaps some spiced gingerbread truffles.
If you prefer a fruitier contrast to the sweet glaze, a key lime bundt cake offers a zesty bite that cleanses the palate between sweet holiday treats. The contrast of the hard, shiny glaze with a soft, moist cake creates a wonderful sensory experience for your guests.
Frequently Asked Questions
While honey provides shine, it has a strong flavor and a yellowish tint. Light corn syrup is preferred for its neutral taste and ability to dry into a crystal-clear, hard shell.
No, once the glaze has set, the cookies can be stored at room temperature in an airtight container for up to a week. Refrigeration can actually dull the glossy finish.
Let the mixed glaze sit for 10-15 minutes to allow bubbles to rise. You can then pop them with a toothpick or a scribe tool before applying the glaze to the cookies.
Wait for the first color to develop a ‘skin’ (about 30-45 minutes) before piping an adjacent color. This ensures the boundaries stay crisp and clean.
If your glaze remains tacky, it likely has too much liquid or the humidity in your kitchen is too high. Ensure you use the exact ratio of corn syrup and let them dry for a full 24 hours.
The Ultimate Sugar Cookie Glaze Recipe
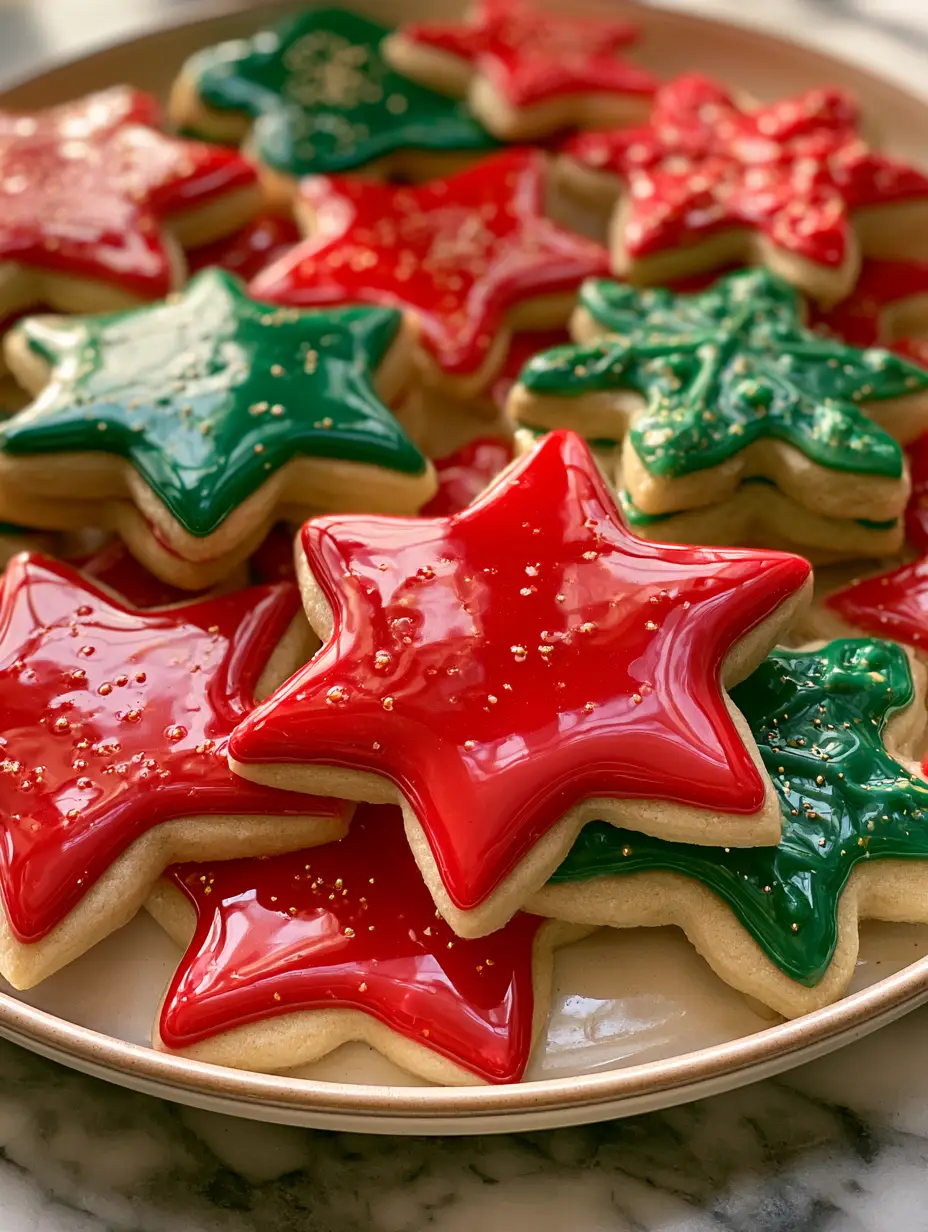
Sugar Cookie Glaze: The Secret to Glossy, Stackable Holiday Cookies
Ingredients
Equipment
Method
- In a medium bowl, whisk together the sifted powdered sugar, milk, and vanilla extract until a thick, smooth paste forms.
- Add the light corn syrup and whisk until the mixture is glossy and reflects light. The texture should look glass-like.
- Separate the glaze into bowls and stir in gel food coloring until vibrant red and green hues are achieved.
- Dip cookies or pipe glaze onto stars and snowflakes. While wet, add gold sprinkles and nonpareils. Let dry for 24 hours to become stackable.
Notes
The 10-second rule is the best way to check for perfect self-leveling consistency.

Closing & Call to Action
Mastering the perfect sugar cookie glaze is a rite of passage for any home baker. With that glass-like finish and vibrant holiday colors, your cookies will be the highlight of any festive gathering. The combination of shine, stability, and sweetness makes this recipe a permanent resident in my digital recipe box.
If you enjoyed making these glossy treats, please leave a comment below and tell me how your stars and snowflakes turned out! Don’t forget to share your beautiful creations on Pinterest by following thewholesomeskillet. For more daily baking inspiration and professional tips, sign up for our newsletter!