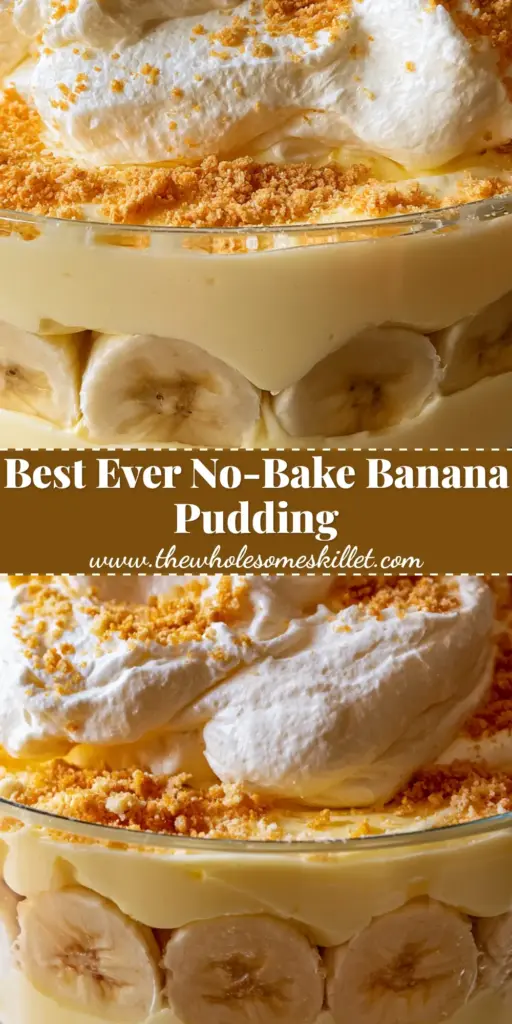
There is something inherently nostalgic about a towering banana pudding served in a clear glass trifle bowl. It is the centerpiece of every Southern potluck, a shimmering beacon of creamy custard, crisp golden wafers, and clouds of whipped cream. When you look at a perfectly assembled version, you see those distinct, artisanal layers that promise a symphony of textures in every spoonful.
This recipe focuses on the forensic details that make a dessert memorable. We are moving away from instant mixes and artificial flavors to embrace the science of a true, pale yellow vanilla custard. The result is a dish that catches the soft natural afternoon sunlight, showing off its vibrant textures and row upon row of perfectly sliced fruit.
Whether you are making this for a summer barbecue or a cozy family dinner, the visual appeal is just as important as the taste. By pressing the banana slices firmly against the glass, we create a professional food photography look right in your own kitchen. Let’s dive into the architecture of the perfect banana pudding.
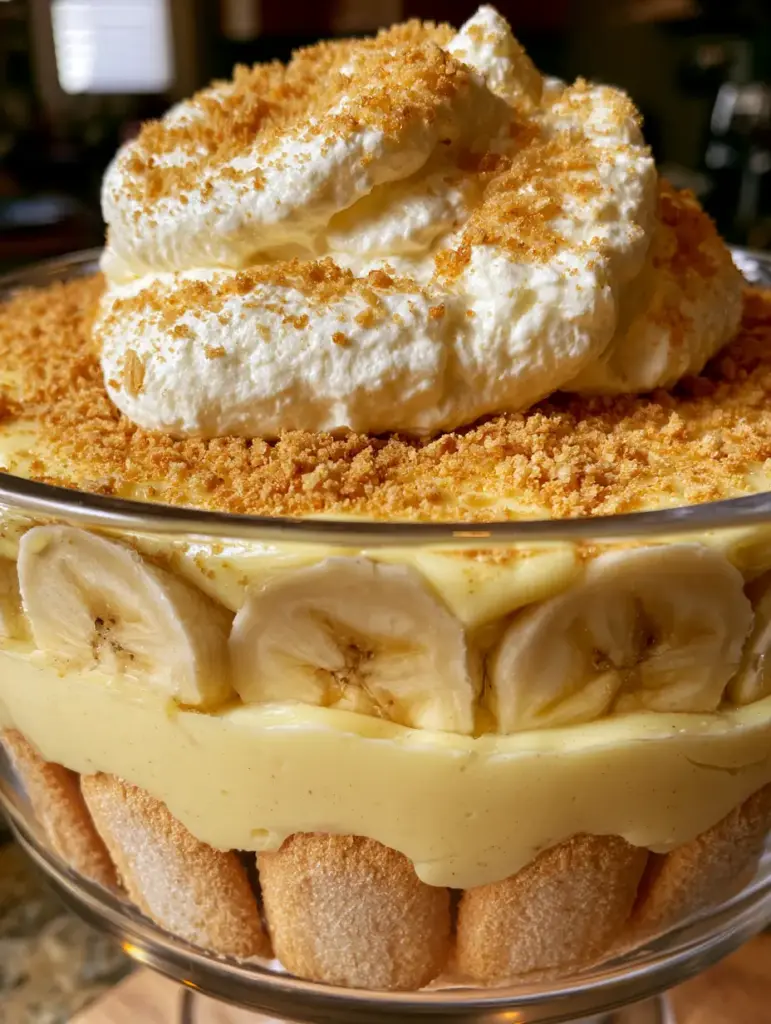
Why This Artisanal Layered Dessert Stands Out
- The Silky Custard Foundation: A thick, pale yellow vanilla custard made from scratch provides a rich, buttery mouthfeel that instant versions simply cannot replicate.
- Textural Contrast: We use golden-brown vanilla wafers that transition from a satisfying crunch to a cake-like softness as they hydrate in the pudding.
- Visual Precision: By layering the bananas specifically against the glass, we achieve that iconic, high-end bakery aesthetic seen in professional food styling.
- Cloud-Like Topping: A massive swirl of stabilized whipped cream adds height and a light, airy finish that balances the dense custard.
The Anatomy of Ingredients for Professional Results
Egg Yolks (4 large): These are responsible for the thick, silky texture and the signature pale yellow hue of the custard. They provide the fat necessary for a luxurious mouthfeel.
Granulated Sugar (3/4 cup / 150g): This sweetens the base while helping to stabilize the egg proteins during the tempering process. It ensures the custard doesn’t curdle under heat.
Cornstarch (3 tbsp / 24g): The primary thickening agent that gives the pudding its structure. It allows the custard to hold its shape when layered in the trifle bowl.
Whole Milk (3 cups / 720ml): The high fat content in whole milk is non-negotiable for a creamy result. Using lower fat milks will result in a watery, less stable pudding.
Unsalted Butter (2 tbsp / 28g): Whisked in at the end, the butter adds a glossy finish and a depth of flavor that rounds out the vanilla notes.
Pure Vanilla Extract (2 tsp / 10ml): Use a high-quality extract or vanilla bean paste to get those beautiful tiny black specks and a potent floral aroma.
Ripe Bananas (5-6 medium): Look for bananas that are yellow with just a few brown spots. They need to be sweet but firm enough to hold their shape when sliced.
Vanilla Wafers (11 oz / 312g box): These golden-brown cookies act as the structural “bones” of the trifle. We will also crush some to create the final golden cookie crumb dusting.
Heavy Whipping Cream (2 cups / 480ml): Cold heavy cream is essential for creating the massive, fluffy cloud topping that defines the Midjourney-inspired visual.
Powdered Sugar (1/4 cup / 30g): This sweetens and stabilizes the whipped cream, ensuring the massive swirls don’t deflate before serving.
Essential Equipment for a Stunning Trifle
To achieve the look of a professional macro shot, you will need a clear glass trifle bowl (approximately 3-4 quart capacity). The transparency is vital for showing off the distinct layers of wafers, custard, and fruit. A heavy-bottomed saucepan is required for the custard to ensure even heat distribution, preventing the bottom from scorching.
A fine-mesh sieve is a “secret weapon” for artisanal pudding; straining the custard after cooking removes any tiny bits of cooked egg, ensuring a perfectly silky texture. Finally, an offset spatula and a piping bag with a large round tip will help you create that massive, cloud-like swirl of whipped cream on top.
The Culinary Science of the Perfect Vanilla Custard
Tempering the Yolks for Silky Smoothness
In a medium bowl, whisk your egg yolks and sugar until the mixture becomes pale and slightly frothy. Whisk in the cornstarch until no lumps remain. In your saucepan, heat the milk over medium heat until tiny bubbles form around the edges (scalding point), but do not let it boil.
Slowly drizzle about half a cup of the hot milk into the egg mixture while whisking constantly. This “tempering” process raises the temperature of the eggs gradually so they don’t scramble. Once tempered, pour the egg mixture back into the saucepan with the remaining milk.
Cooking to the Ideal Thickness
Continue to cook the mixture over medium-low heat, whisking incessantly. You are looking for a specific sensory cue: the whisk will start to leave distinct trails in the liquid, and it will suddenly thicken to a consistency similar to warm mayo. Once it reaches a slow boil (one or two large bubbles popping), cook for exactly one more minute to fully hydrate the starch.
Remove from heat and immediately whisk in the butter and vanilla extract. The custard should be vibrant, pale yellow, and incredibly glossy. Pour the custard through a fine-mesh sieve into a clean bowl to catch any imperfections. Cover the surface directly with plastic wrap to prevent a skin from forming and chill for at least 4 hours.
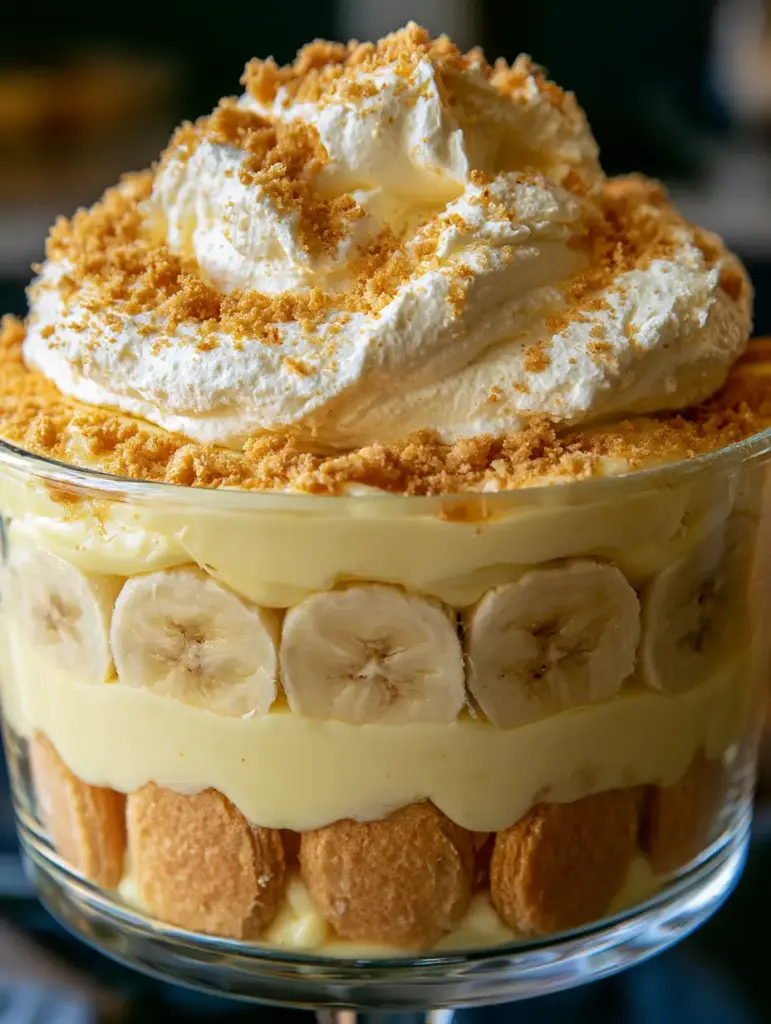
Mastering the Artisanal Layering Technique
Building the Base Foundation
Start by placing a dense layer of golden-brown vanilla wafers at the base of your clear glass trifle bowl. You want a solid foundation that can support the weight of the custard above. If you love this flavor profile, you might also enjoy the unique twist of my Biscoff banana pudding for a deep caramel note.
The “Pro-Shot” Banana Alignment
This is the critical bridge to the visual blueprint. Slice your bananas into even 1/4-inch (6mm) rounds. Take the most uniform slices and press them vertically against the inside of the glass bowl, resting them on the cookie base. This creates that stunning row of fruit visible from the outside. Fill the center of the bowl with more banana slices.
Applying the Silky Custard Layers
Gently spoon half of your chilled, thick yellow custard over the bananas. Use the back of a spoon to push the custard into the gaps between the bananas against the glass. This ensures the layers remain distinct and prevents air pockets. Repeat the process: a layer of wafers, a row of bananas against the glass, and the remaining custard. For a different texture, consider how this filling works in a banana pudding cheesecake.
Creating the Cloud-Like Whipped Topping
In a chilled bowl, beat the heavy cream and powdered sugar until stiff peaks form. The cream should be thick enough to hold its shape but still look fluffy and soft. To get that “massive cloud-like swirl” described in the Midjourney prompt, use a piping bag to create large, overlapping dollops, or use a spatula to swoop the cream into high peaks.
For the final touch, take about 5-6 vanilla wafers and crush them into a coarse, golden sand. Sprinkle this dusting generously over the whipped cream. The contrast between the white cream and the golden cookie crumbs provides a beautiful texture that screams “handheld smartphone photo” realism. If you have extra crumbs, they are fantastic when folded into banana pudding fudge.
Expert Tips for Success
- Prevent Browning: Toss your banana slices in a tablespoon of lemon juice before layering. The acidity prevents oxidation, keeping the fruit looking fresh and vibrant for hours.
- Chill Time: Always allow the assembled pudding to sit in the fridge for at least 4-6 hours before serving. This allows the wafers to soften slightly, creating the iconic cake-like texture.
- Custard Consistency: If your custard feels too thick after chilling, whisk it vigorously for 30 seconds to break the gel structure and make it pourable again.
- Whipping Temperature: Ensure your cream, bowl, and whisk are ice-cold. This allows the fat globules to trap more air, resulting in a loftier, more stable cloud.
Storage and Make-Ahead Advice
Banana pudding is best enjoyed within 24 to 48 hours of assembly. Beyond that, the bananas may begin to release moisture, making the custard runny, and the wafers may become overly mushy. Always store the trifle bowl covered tightly with plastic wrap in the refrigerator.
You can make the vanilla custard up to 3 days in advance and store it in an airtight container. However, do not slice the bananas or whip the cream until you are ready to assemble the final dish. This recipe does not freeze well, as the custard will separate and the bananas will turn black upon thawing.
What to Serve With Southern Banana Pudding
This dessert is quite rich and creamy, so it pairs perfectly with savory, salty main dishes. It is a classic follow-up to a hearty meal like garlic parmesan chicken and potatoes or a robust steak and cheese potato bake.
If you are hosting a themed dessert bar, consider serving smaller portions of this pudding alongside cinnamon sugar twists or a slice of Brazilian coconut cake to offer a variety of tropical and nostalgic flavors.
Frequently Asked Questions
Yes, banana pudding actually benefits from a 4-24 hour chill time, as this allows the vanilla wafers to soften slightly into a cake-like consistency. However, add the whipped cream and cookie crumbs just before serving.
While instant mix is faster, scratch-made custard uses egg yolks and whole milk to provide a much richer, silkier texture and a natural pale yellow color that is essential for an artisanal trifle.
Toss your banana slices in a small amount of lemon or pineapple juice before layering. The acidity slows down the oxidation process, keeping them bright and fresh.
Traditional golden-brown vanilla wafers (like Nilla Wafers) are the standard choice because they absorb the custard moisture perfectly without becoming completely disintegrated.
Runny pudding usually happens if the custard wasn’t cooked long enough to activate the cornstarch or if the bananas were overripe and released too much moisture. Ensure the custard reaches a boil for 1 minute.
The Ultimate Artisanal Banana Pudding Recipe
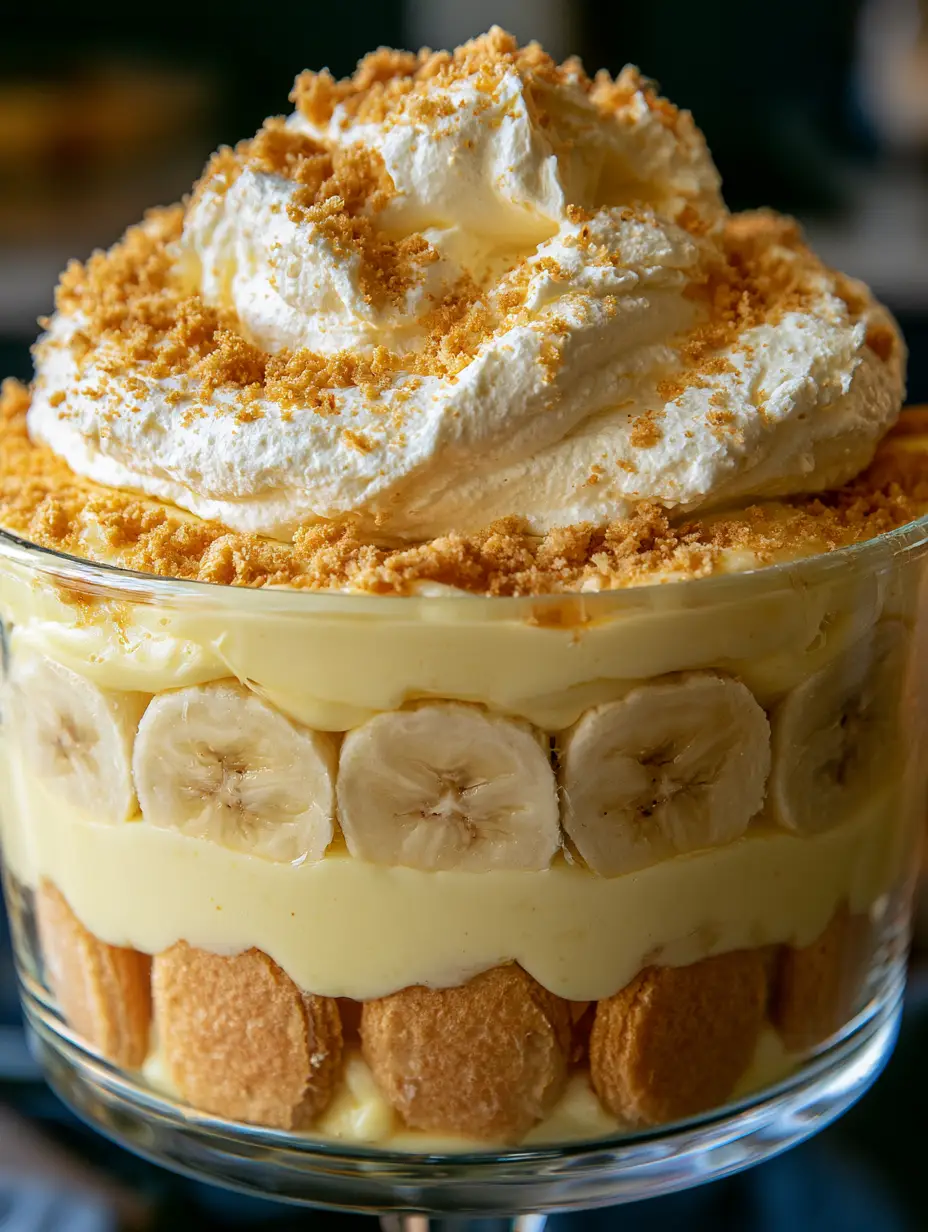
Banana Pudding: The Ultimate Southern Trifle with Silky Vanilla Custard
Ingredients
Equipment
Method
- In a medium bowl, whisk together egg yolks, granulated sugar, and cornstarch until pale and smooth.
- Heat milk in a saucepan over medium heat until steaming. Slowly whisk half of the hot milk into the egg mixture to temper.
- Return the mixture to the pan. Whisk constantly until the custard thickens and large bubbles pop. Cook for 1 minute more.
- Remove from heat. Stir in butter and vanilla. Strain through a sieve and chill with plastic wrap touching the surface for 4 hours.
- Place a layer of vanilla wafers at the bottom of the glass bowl. Press banana slices vertically against the glass walls.
- Spread half of the chilled custard over the cookies and bananas, ensuring all gaps are filled.
- Repeat with another layer of cookies, bananas against the glass, and the remaining custard.
- Beat heavy cream and powdered sugar to stiff peaks. Pipe or spoon massive swirls on top of the pudding.
- Crush remaining vanilla wafers and sprinkle the golden cookie crumbs generously over the whipped cream.
Notes
Strain the custard to ensure a professional, silky artisanal texture.
Share Your Trifle Creations!
Nothing beats the sight of a clear glass bowl filled with these golden layers. If you make this banana pudding, I want to see your artisanal swirls and perfectly pressed bananas! Leave a comment below telling me how your custard turned out, or better yet, snap a photo and share it with us. Don’t forget to follow thewholesomeskillet on Pinterest and pin this recipe to your favorite dessert boards for your next big gathering!