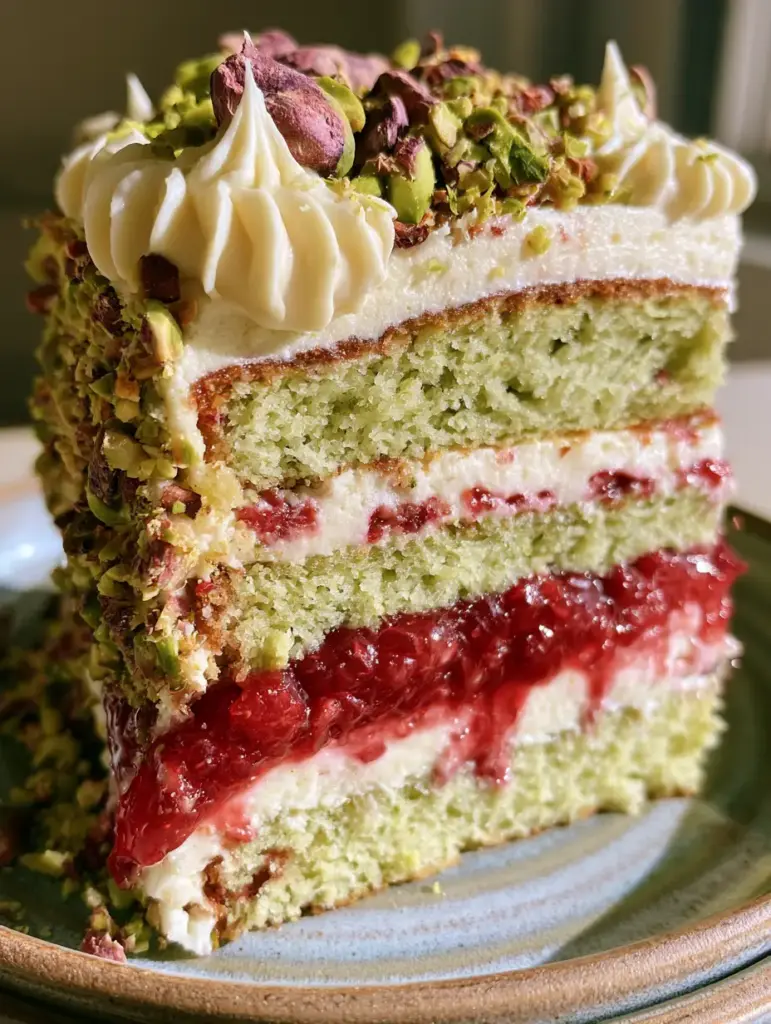
The raspberry pistachio layer cake is the crown jewel of elegant home baking, offering a sophisticated balance of nutty earthiness and tart fruit brightness. This isn’t just a dessert; it’s a sensory experience featuring a moist, light green pistachio sponge, a thick oozing layer of vibrant red raspberry jam, and a velvety white mascarpone frosting flecked with real vanilla bean specks.
Imagine slicing into a tall, majestic cake where the morning sunlight hits the crumbly texture of a perfectly baked sponge. The contrast between the emerald green nuts and the liquid ruby jam makes every forkful look like a work of art, much like a gourmet pastry shop find. Whether you are celebrating a milestone or simply craving a high-end treat, this recipe delivers professional results with accessible techniques.
Designed for the enthusiastic home cook, this cake prioritizes texture and visual impact. We have engineered the crumb to be tender yet sturdy enough to hold that luscious raspberry center without collapsing. By incorporating both ground pistachios and premium mascarpone, we achieve a richness that standard buttercream simply cannot match.
Why You Will Fall in Love With This Pistachio Raspberry Masterpiece
- Textural Contrast: You get the delicate crumble of the pistachio sponge paired with the silkiness of the mascarpone cream and the crunch of toasted emerald and purple pistachios.
- Natural Vibrancy: The striking light green hue of the cake comes from real nuts, beautifully offset by the deep, oozing red of the fresh raspberry filling.
- Sophisticated Flavor Profile: Unlike overly sweet grocery store cakes, this recipe balances the savory notes of pistachio with the bright acidity of raspberries and the floral aroma of vanilla bean.
- Professional Aesthetics: With elegant piped swirls and a heavy sprinkle of chopped nuts, this cake looks like it belongs in a professional food photography session.
The Anatomy of an Elite Raspberry Pistachio Layer Cake
To achieve the specific visual and structural results seen in our blueprint, every ingredient serves a forensic purpose. We aren’t just mixing batter; we are building a foundation for flavor and height.
Roasted Pistachios: You will need 2 cups (250g) of shelled pistachios. We grind a portion into a fine flour for the sponge’s color and flavor, while the rest are toasted and chopped for that signature crunch on top.
Fresh Raspberries: 3 cups (375g) of fresh berries are essential for the jam. They provide the “oozing” quality and vibrant red color that frozen berries often lack due to excess moisture.
Mascarpone Cheese: 16 oz (450g) of cold mascarpone is the secret to a stable whipped frosting. It adds a velvety thickness and a slight tang that cuts through the sugar.
Vanilla Bean Pods: Using 2 whole vanilla beans ensures those beautiful black specks are visible throughout the frosting. If you don’t have pods, high-quality vanilla bean paste is a must-have substitute.
Cake Flour: 2.5 cups (300g) of cake flour, rather than all-purpose, ensures the sponge remains “moist and crumbly” rather than bread-like. The lower protein content is key for that delicate pistachio crumb.
Unsalted Butter: 1 cup (225g) of softened butter provides the fat necessary for a tender mouthfeel. Ensure it is at room temperature to properly emulsify with the sugar.
Essential Tools for a Professional Tall Slice
Achieving a tall, perfectly layered slice requires more than just standard pans. You will need three 8-inch (20cm) round cake pans to create the necessary height for the “extreme close-up” look.
A food processor is vital for grinding the pistachios into a fine meal without turning them into butter. You will also need a fine-mesh sieve to strain the raspberry seeds if you prefer a smoother “oozing” jam layer.
For the frosting, a stand mixer fitted with a whisk attachment is best for achieving those “elegant piped swirls.” Finally, an offset spatula and a piping bag with a large star tip will help you replicate the professional finish.
Step-by-Step: Crafting the Perfect Pistachio Sponge
Preparing the Pistachio Flour
Start by placing 1.5 cups (185g) of the pistachios into a food processor. Pulse until they reach a fine, sandy texture; be careful not to over-process, or the oils will release and create a paste.
Whisk this pistachio meal with your cake flour, 1.5 tsp (7g) baking powder, and 0.5 tsp (3g) salt. This ensures the nutty flavor is evenly distributed throughout every crumb of the light green sponge.
Creaming for Maximum Aeration
In your stand mixer, cream 1 cup (225g) of butter with 1.75 cups (350g) of granulated sugar until the mixture is pale and fluffy. This process should take about 3-5 minutes at medium-high speed.
Add 4 large eggs one at a time, ensuring each is fully incorporated before adding the next. This builds the emulsion that keeps the cake moist and prevents it from becoming dense or oily.
Folding and Baking
Alternate adding your dry pistachio mixture and 1 cup (240ml) of whole milk to the butter. Start and end with the dry ingredients, mixing only until just combined to avoid overworking the gluten.
Divide the batter evenly between your three pans and bake at 350°F (175°C) for 25-30 minutes. Look for the “visual cue” of the edges pulling away slightly from the pan and the tops springing back when gently pressed.
Creating the Oozing Raspberry Filling
Combine your fresh raspberries with 0.5 cup (100g) of sugar and 1 tbsp (15ml) of lemon juice in a small saucepan. Simmer over medium heat, mashing the berries until they break down into a thick, bubbling sauce.
To achieve that “thick oozing” consistency without it running off the cake, mix 1 tbsp (8g) of cornstarch with a splash of water and stir it into the jam. Boil for 1 minute until the mixture coats the back of a spoon with a vibrant red sheen.
Allow the jam to cool completely before using. If you enjoy the contrast of flavors in this cake, you might also love our raspberry pistachio bars for a quicker afternoon snack.
Stabilizing the Mascarpone Whipped Frosting
Whip 2 cups (480ml) of heavy cream with 16 oz (450g) of mascarpone and 1 cup (120g) of powdered sugar. Scrape the seeds from two vanilla bean pods directly into the bowl.
Watch the texture closely; you are looking for “velvety white” peaks that hold their shape. The mascarpone acts as a natural stabilizer, meaning this frosting won’t melt as quickly as standard whipped cream.
If you find yourself with extra mascarpone, it is the perfect excuse to try our pistachio tiramisu for your next dinner party.
Assembly Secrets for a Tall, Meticulous Slice
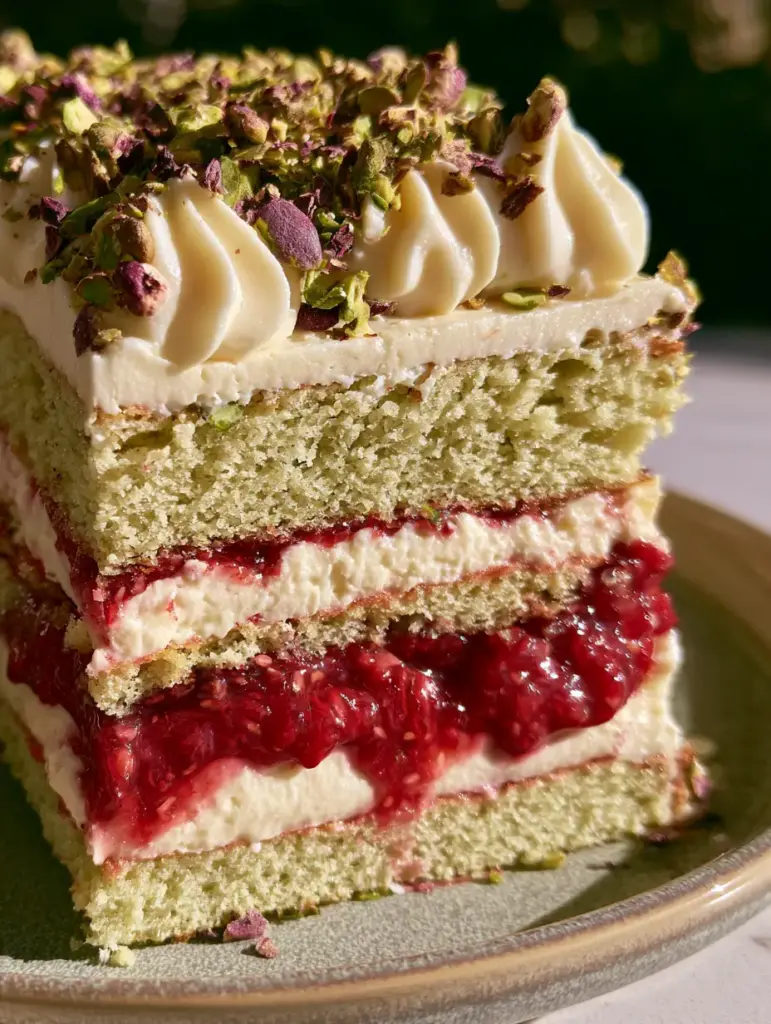
Place your first cooled pistachio sponge on a plate. Pipe a “dam” of mascarpone frosting around the edge to hold the raspberry filling in place—this is the secret to a clean, professional look.
Spread half of the raspberry jam inside the dam, then top with the second cake layer. Repeat the process, ensuring the cake remains level as you build the height. Apply a thin “crumb coat” of frosting and chill for 20 minutes.
Finish with a thick final layer of frosting. Use a piping bag to create elegant swirls on top, then generously shower the cake with the remaining chopped emerald and purple pistachios for that rustic, unedited aesthetic.
Expert Tips for Bakery-Quality Results
- Temperature Control: Ensure your mascarpone and heavy cream are ice-cold. If they are too warm, the frosting will break and become grainy rather than velvety.
- Sponge Color: For a more intense “light green” look, use high-quality Sicilian or Iranian pistachios, which tend to have a more vibrant interior than standard varieties.
- Preventing Soggy Layers: Always let your raspberry jam cool to room temperature (or colder) before filling. Warm jam will melt the mascarpone and cause the layers to slide.
- The Perfect Cut: To get a “meticulously detailed” slice like in the photo, use a sharp chef’s knife dipped in hot water and wiped dry between every single cut.
Mastering the Art of Storage and Make-Ahead
This raspberry pistachio layer cake is best enjoyed within 24 hours of assembly, as the moisture from the jam will eventually begin to soften the sponge. However, you can store it in an airtight container in the refrigerator for up to 3 days.
If you need to make it ahead of time, bake the sponges, wrap them tightly in plastic wrap, and freeze for up to a month. Thaw the sponges in the fridge overnight before assembling with fresh jam and frosting.
We do not recommend freezing the fully assembled cake, as the mascarpone frosting can change texture upon thawing, losing its velvety smoothness.
What to Serve with This Elegant Layer Cake
This cake is a showstopper on its own, but it pairs beautifully with a glass of chilled Prosecco or a hot cup of Earl Grey tea. The floral notes of the tea complement the vanilla bean and pistachio perfectly.
If you are hosting a large dessert spread, consider offering contrasting textures like our caramel pound cake or a decadent flourless chocolate cake for the chocolate lovers in the group.
For those who prefer fruit-forward desserts, a side of lemon custard cake provides a bright citrus punch that cleanses the palate between bites of rich pistachio cream.
Frequently Asked Questions
You can substitute the cake flour for a high-quality 1:1 gluten-free baking flour. The pistachio meal is naturally gluten-free and will help maintain a moist crumb.
Yes, you can substitute 1/2 cup of the ground pistachios for 1/2 cup of pure pistachio paste to get a more intense green color and smoother texture, but reduce the butter by 2 tablespoons to compensate for the fat.
While pods provide the best visual ‘specks’ and flavor, you can substitute 1 tablespoon of vanilla bean paste or 2 teaspoons of pure vanilla extract if pods are unavailable.
The secret is piping a ‘dam’ or ring of the thick mascarpone frosting around the edge of each layer before adding the jam. This acts as a wall to keep the filling from leaking out.
Graininess usually occurs if the mascarpone is over-whipped or if it wasn’t cold enough when you started. Always whip on medium speed and stop as soon as stiff peaks form.
The Ultimate Raspberry Pistachio Layer Cake Recipe
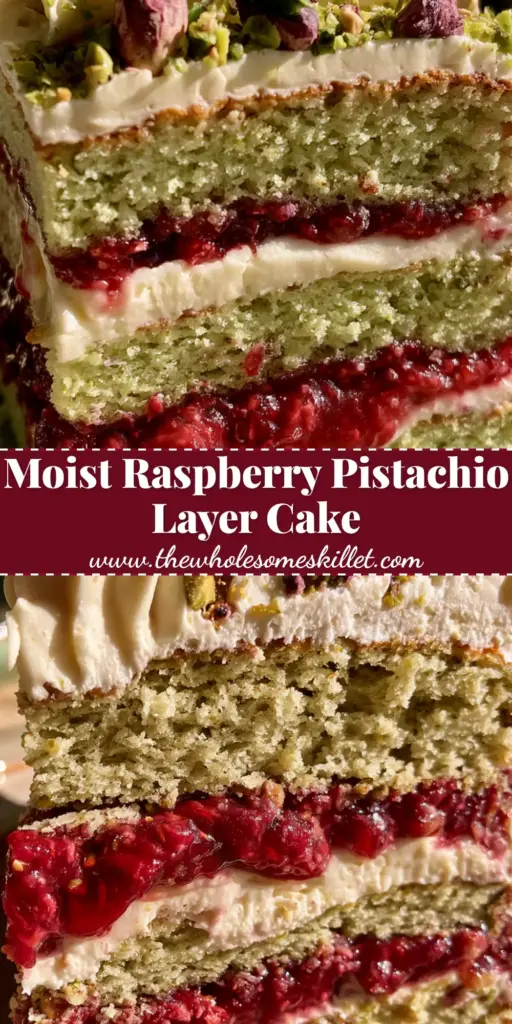
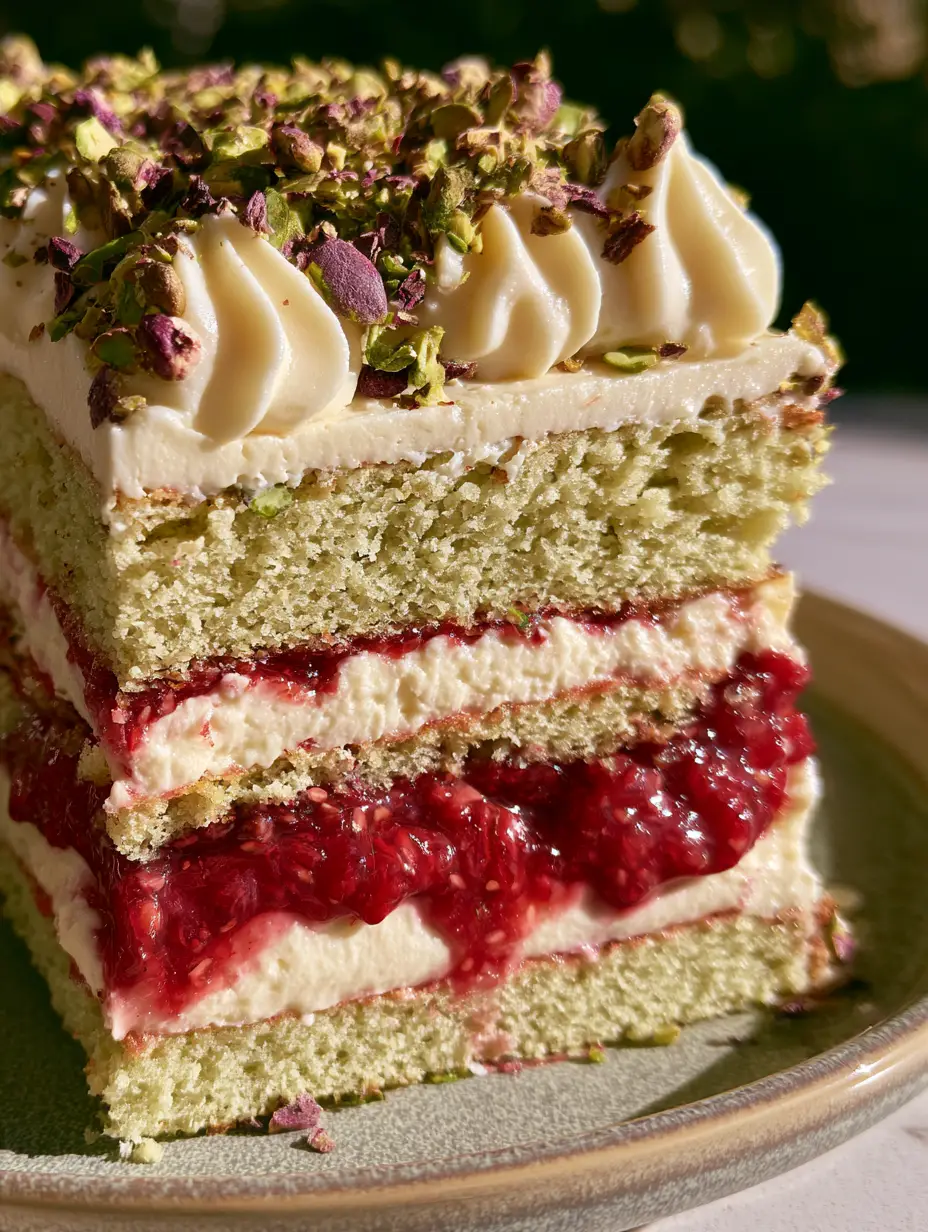
Raspberry Pistachio Layer Cake with Mascarpone Whipped Frosting
Ingredients
Equipment
Method
- Pulse 1.5 cups pistachios in a food processor until fine meal forms. Whisk with flour, baking powder, and salt.
- Cream butter and sugar for 5 minutes. Add eggs one by one. Alternate adding flour mixture and milk until just combined.
- Divide into three 8-inch pans. Bake at 350°F (175°C) for 25-30 minutes until the centers spring back. Cool completely.
- Combine raspberries, sugar, and lemon juice in a pan. Simmer until broken down. Add cornstarch slurry and boil for 1 minute to thicken. Cool completely.
- Whip cold mascarpone, heavy cream, powdered sugar, and vanilla bean specks until stiff, velvety peaks form.
- Layer cake with frosting dams and raspberry jam. Crumb coat and chill. Finish with frosting swirls and a heavy sprinkle of toasted emerald and purple pistachios.
Notes
Toast the garnish pistachios for 5 minutes at 300°F (150°C) to bring out their vibrant color.
Closing & Call to Action
This raspberry pistachio layer cake is the ultimate marriage of flavor, texture, and visual beauty. From the crumbly pistachio sponge to the oozing raspberry heart, every element is designed to impress your guests and satisfy your culinary cravings. We can’t wait to see your tall, elegant slices!
Did you make this recipe? Leave a comment below and let us know how your pistachio sponge turned out! Don’t forget to follow us and share your beautiful creations on Pinterest so others can enjoy this emerald-green delight.