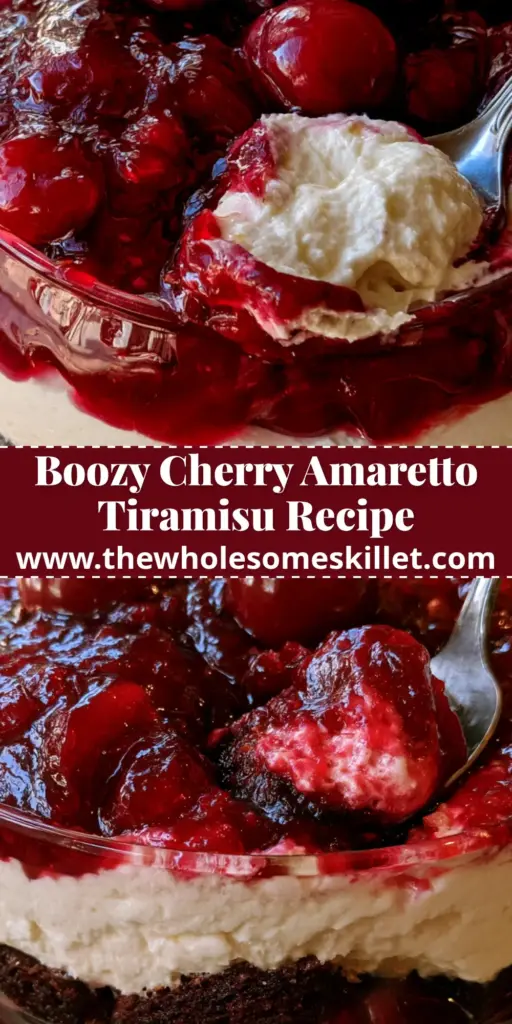
There is something undeniably sophisticated about the marriage of deep almond notes and tart stone fruit. This cherry amaretto tiramisu is not just a dessert; it is a visual and sensory experience that transforms the classic Italian staple into a vibrant, ruby-red showstopper. Designed to be served in an elegant glass coupe or clear jar, this recipe showcases distinct, beautiful layers that demand attention before the first spoonful even reaches your lips.
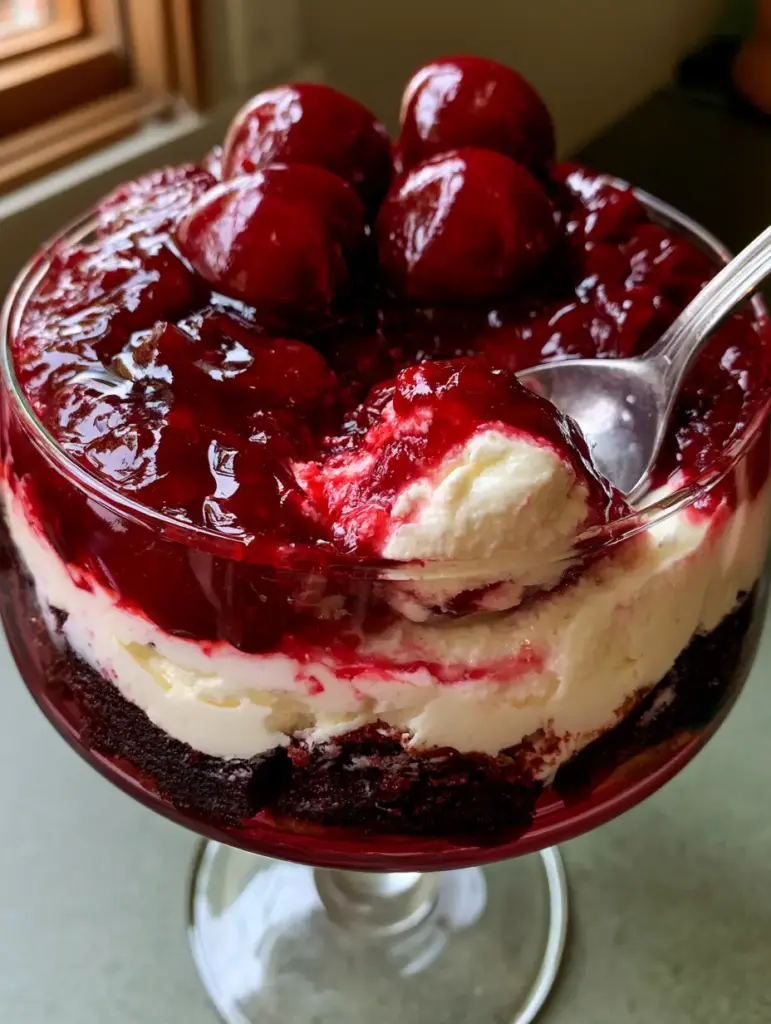
Imagine digging a silver spoon through a glistening ruby-red cherry compote, only to hit a thick layer of velvety white mascarpone cream and a base of dark espresso-soaked ladyfingers. The natural light catching the soft reflections of the glass highlights the realistic food textures we strive for in every bite. This is the ultimate “wow-factor” dessert for home cooks looking to elevate their hosting game with professional-grade results.
Why You’ll Fall in Love with This Boozy Cherry Tiramisu
- Perfectly Defined Layers: Using clear glass vessels allows the dark espresso base and stark white cream to pop against the glistening cherry topping.
- Sophisticated Flavor Profile: The bitterness of the espresso balances the sweet almond notes of the Amaretto liqueur and the tartness of the cherries.
- No-Bake Elegance: This recipe requires zero oven time, making it the perfect high-reward dessert for warm weather or busy holidays.
- Textural Contrast: You get the crunch-turned-cake-like ladyfingers, the silkiness of the mascarpone, and the slight bite of whole, plump cherries.
The Anatomy of Flavor: Essential Ingredients for Tiramisu Success
Savoiardi (Ladyfingers): 7 oz (200g) of these crisp, airy Italian biscuits are the structural foundation. They act as a sponge for the espresso and liqueur without turning into mush.
Strong Espresso: 1.5 cups (350ml) of high-quality brewed espresso provides the necessary bitter backbone to cut through the rich fats of the cream. Ensure it is cooled to room temperature before dipping.
Amaretto Liqueur: 0.5 cup (120ml) divided between the soaking liquid and the cream. This Italian almond liqueur is the aromatic heart of the dish, providing a sweet, nutty fragrance.
Mascarpone Cheese: 1 lb (450g) of full-fat Italian cream cheese. This is what creates that signature thick, velvety white middle layer seen in our visual blueprint.
Heavy Whipping Cream: 1 cup (240ml) of chilled cream, beaten to stiff peaks. Folding this into the mascarpone ensures the filling remains light and airy rather than dense and heavy.
Granulated Sugar: 0.75 cup (150g) total, split between the compote and the cream. This balances the acidity of the cherries and the bitterness of the coffee.
Dark Red Cherries: 2 cups (300g) of fresh, pitted cherries. Using fresh fruit ensures a “glistening” appearance and a firm texture that frozen fruit often lacks.
Cornstarch: 1 tbsp (8g) dissolved in a little water. This is the secret “invisible” ingredient that creates the glossy, thick consistency for the cherry compote.
Foundational Seasonings: A pinch of sea salt to enhance the cocoa notes of the espresso and 1 tsp (5ml) of vanilla extract to round out the cream filling.
Mint Leaf Garnish: A few sprigs of fresh mint to provide a vibrant green contrast against the ruby-red cherries for the final presentation.
Professional Tools for a Flawless Presentation
To achieve the handheld smartphone photo aesthetic described in our prompt, you need the right vessels. An elegant glass coupe or clear glass jars are essential to reveal those distinct layers. You will also need a fine-mesh sieve for any cocoa dusting (optional) and a high-speed hand mixer or stand mixer to achieve the velvety texture of the mascarpone cream. A heavy-bottomed saucepan is required to simmer the cherry compote to its glossy perfection.
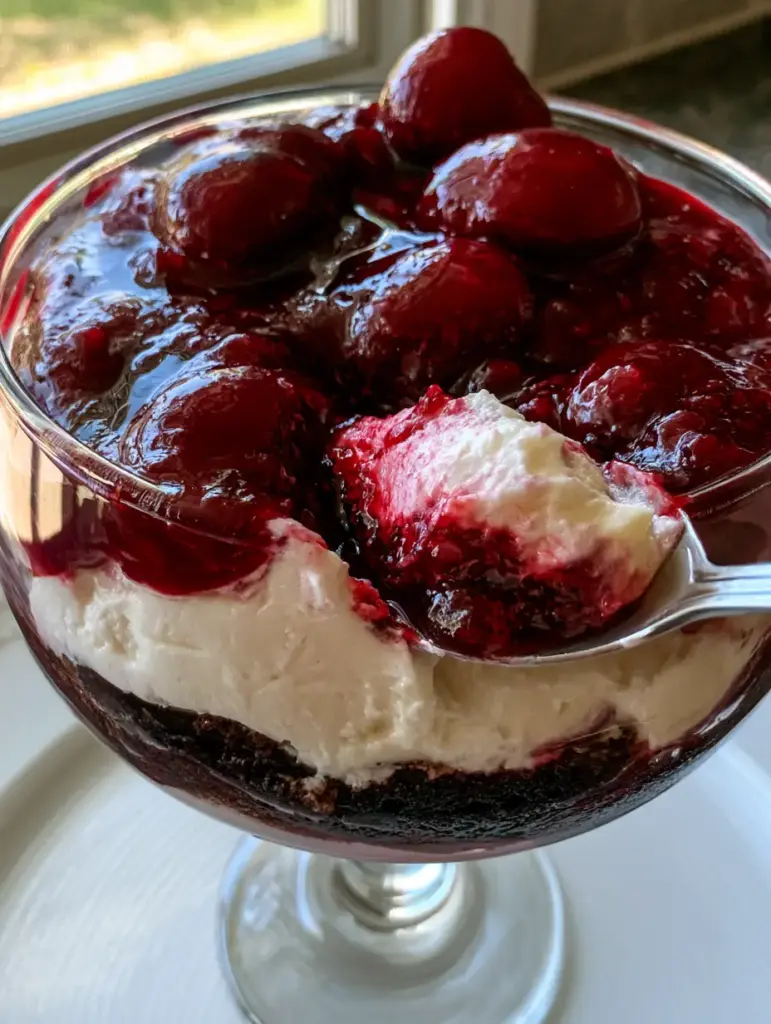
Mastering the Glossy Ruby-Red Cherry Compote
Simmering for Depth and Color
In your saucepan, combine the pitted cherries, half the sugar, and a splash of amaretto. Simmer over medium heat for about 10-12 minutes. You are looking for the cherries to release their juices while maintaining their shape—they should look like large whole cherries in a thick syrup.
The Secret to the Glistening Finish
Whisk the cornstarch into a tablespoon of cold water to create a slurry. Stir this into the simmering cherries. Watch as the cloudy liquid suddenly turns transparent and takes on a glistening, ruby-red sheen. Remove from heat immediately and let it cool completely; it will thicken further into a compote as it rests.
Crafting the Velvety Mascarpone Cream Layer
Whipping to Stiff Peaks
In a chilled bowl, beat your heavy cream until it holds a stiff peak. This is crucial for structural integrity. If your cream is too soft, your tiramisu will collapse into a puddle once you dig in with a silver spoon. For more inspiration on creamy textures, check out our Biscoff Banana Pudding which masters the art of the perfect whipped base.
Folding for Airiness
In a separate bowl, whisk the mascarpone, remaining sugar, and vanilla until smooth. Gently fold the whipped cream into the mascarpone. You want a thick, velvety white mixture. Avoid over-mixing, or you will deflate the air you worked so hard to incorporate.
The Art of the Two-Second Ladyfinger Soak
The Espresso-Amaretto Bath
Combine your cooled espresso and the remaining amaretto in a shallow bowl. The temperature is key here; if the espresso is hot, the ladyfingers will disintegrate instantly. If you enjoy coffee-infused treats, you might also love our Orange Dreamsicle Pie for a different take on bright, acidic flavors.
Executing the Quick Dip
Dip each ladyfinger for exactly one second per side. You want the exterior to be soaked in dark espresso, but the center should still have a slight snap. As the tiramisu rests in the fridge, the moisture will migrate to the center, creating a cake-like texture that is easy to lift with a spoon.
Assembly: Building the Perfect Visual Layers
The Foundation
Place a layer of soaked ladyfingers at the base of your glass coupe or jar. You may need to break them to fit the curve of the glass. This dark base provides the visual anchor for the dessert.
The Velvety Middle
Spoon a generous amount of the white mascarpone cream over the ladyfingers. Use the back of a spoon to push the cream against the edges of the glass. This ensures the side view reveals a clean, thick middle layer without air pockets.
The Glistening Crown
Top the cream with your cooled cherry compote. Make sure several large whole cherries are visible on top. Finish with a single mint leaf garnish placed off-center for that professional, handheld photo look. For another layered masterpiece, don’t miss our Strawberry Matcha Cookies which also play with vibrant color contrasts.
Expert Tips for Tiramisu Success
- Chill Time is Non-Negotiable: Let the tiramisu set in the refrigerator for at least 4 hours, preferably overnight. This allows the flavors to fuse and the layers to stabilize.
- Use Room Temp Mascarpone: Cold mascarpone can become grainy when mixed. Let it sit on the counter for 15 minutes before whisking.
- Quality of Liqueur Matters: Since Amaretto is a primary flavor, use a reputable brand like Disaronno for the best aromatic experience.
- Fresh Mint Tip: To keep your mint leaf garnish looking perky, place it on the dish only seconds before serving.
Storage and Make-Ahead Advice
This cherry amaretto tiramisu is the ultimate make-ahead dessert. It actually tastes better on day two! You can store the assembled jars in the refrigerator for up to 3 days. Cover them tightly with plastic wrap to prevent the cream from absorbing any fridge odors. We do not recommend freezing this dessert, as the mascarpone and cherry compote can weep and lose their textural integrity upon thawing.
What to Serve With Cherry Amaretto Tiramisu
Because this dessert is rich and boozy, it pairs beautifully with a simple cup of black coffee or an extra shot of espresso. If you are hosting a large dinner party, consider serving this after a savory meal like our Garlic Parmesan Chicken and Potatoes. The acidity of the cherries cleanses the palate perfectly after a garlicky, savory main course.
Frequently Asked Questions
Yes! You can replace the Amaretto liqueur with 1 teaspoon of almond extract in the cream and use a splash of cherry juice in the espresso soak for a similar flavor profile without the alcohol.
You can, but fresh dark red cherries provide a better ‘glistening’ visual and a firmer texture. If using frozen, ensure you simmer them long enough to reduce the extra water they release.
The key is a quick ‘one-second’ dip per side in room-temperature espresso. Never soak them; they should still feel firm in the center when you place them in the glass.
While mascarpone is traditional for its velvety texture, you can use a mix of full-fat cream cheese and a bit of extra heavy cream, though the flavor will be more tangy and less buttery.
The Ultimate Cherry Amaretto Tiramisu Recipe
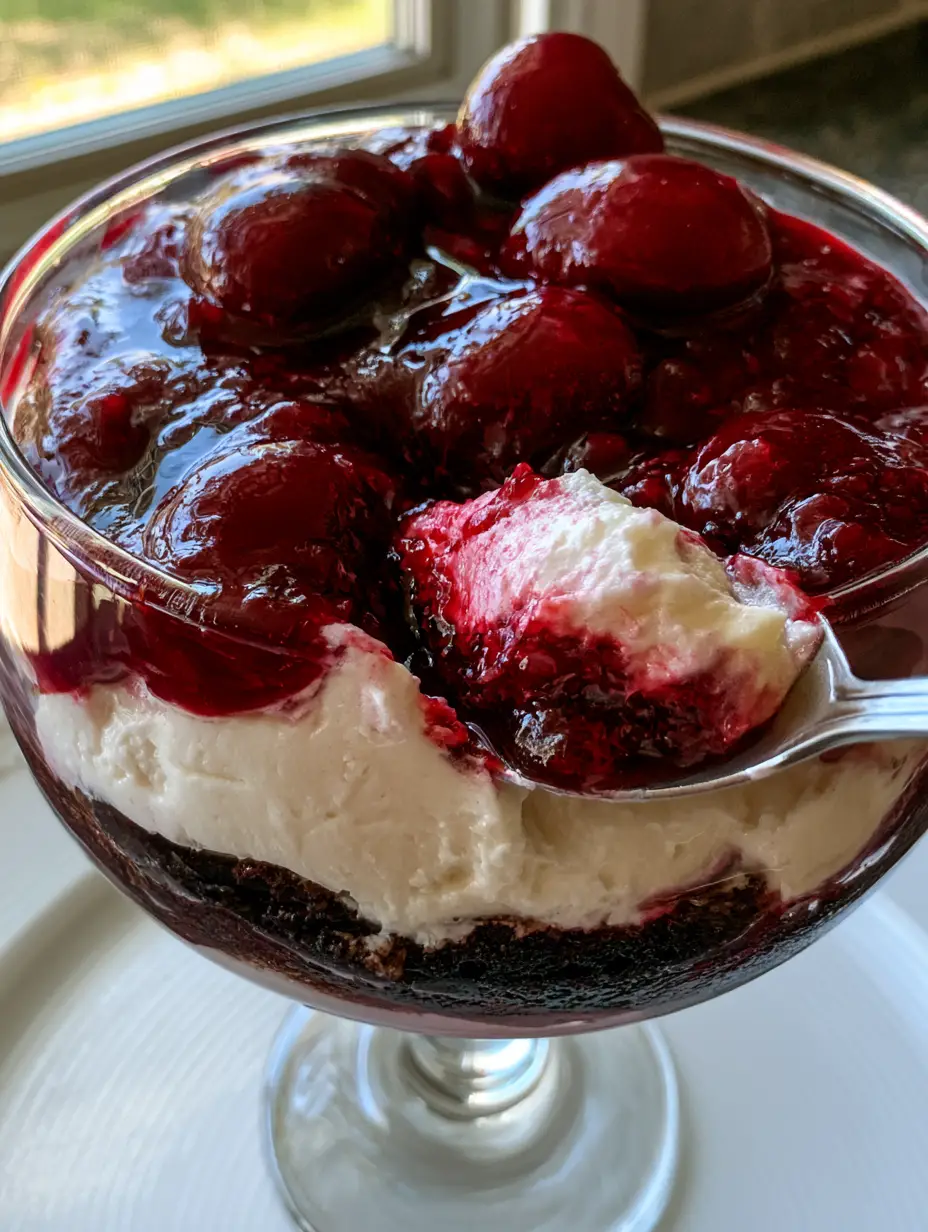
Cherry Amaretto Tiramisu: A Boozy, Layered Italian Masterpiece
Ingredients
Equipment
Method
- In a saucepan, combine pitted cherries and 1/4 cup sugar. Simmer over medium heat for 10 minutes until juices release.
- Stir in the cornstarch slurry. Cook for 1-2 minutes until the mixture is thick and glistening. Let cool completely.
- Beat heavy cream until stiff peaks form. Set aside.
- In a separate bowl, whisk mascarpone, sugar, amaretto, and vanilla until smooth and velvety.
- Gently fold the whipped cream into the mascarpone mixture until fully combined.
- Mix espresso and amaretto in a shallow bowl. Dip ladyfingers for 1 second per side.
- Place soaked ladyfingers at the bottom of the glass. Top with a thick layer of mascarpone cream, then the cooled cherry compote.
- Refrigerate for at least 4 hours. Garnish with a fresh mint leaf before serving with a silver spoon.
Notes
Use a clear glass coupe to showcase the beautiful, distinct layers.
The Final Bite: Join Our Culinary Journey
This cherry amaretto tiramisu is a testament to how simple ingredients, when treated with forensic culinary care, can create something truly magical. The combination of the glistening ruby-red compote and the velvety cream is a triumph of both flavor and aesthetics. We can’t wait to see your versions of this elegant dessert!
If you enjoyed this recipe, please leave a comment below and share your photos with us! Don’t forget to follow thewholesomeskillet on Pinterest for more daily recipe inspiration and “behind-the-lens” food photography tips. Happy layering!