When the holiday season arrives, the quest for the perfect “wow-factor” dessert begins. These oreo dream bars are the answer to every host’s prayer, combining the nostalgic crunch of chocolate cookies with a velvety, cheesecake-like center. Imagine a dessert so decadent it features four distinct layers of holiday magic, all served in a convenient bar format that disappears in minutes.
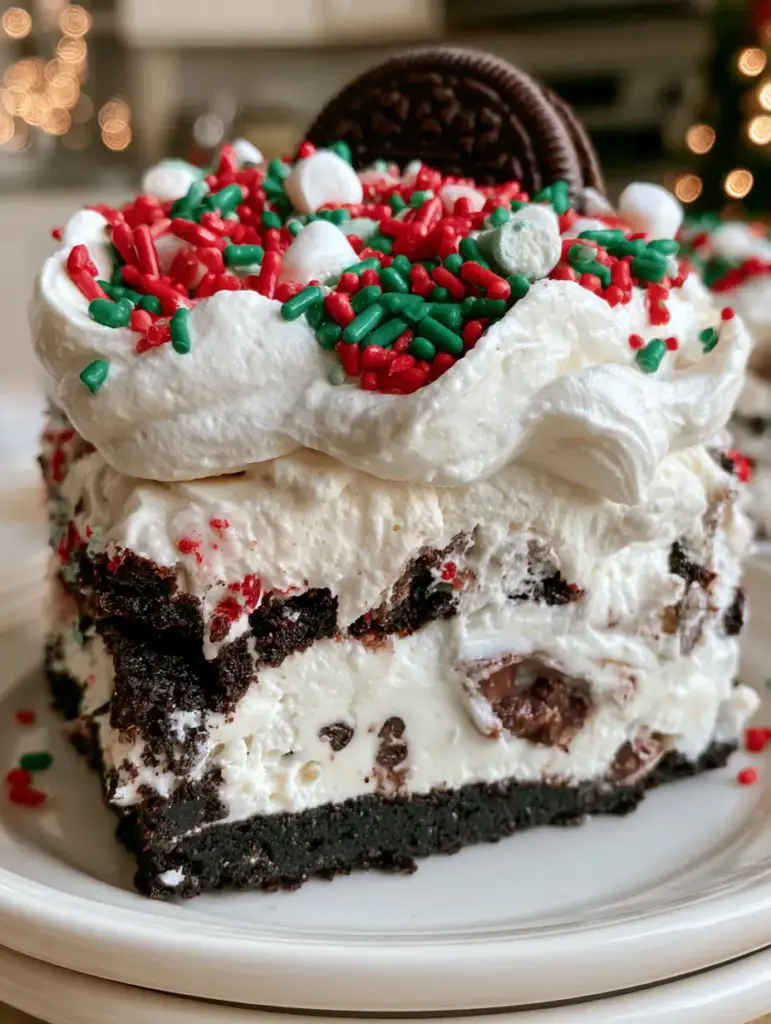
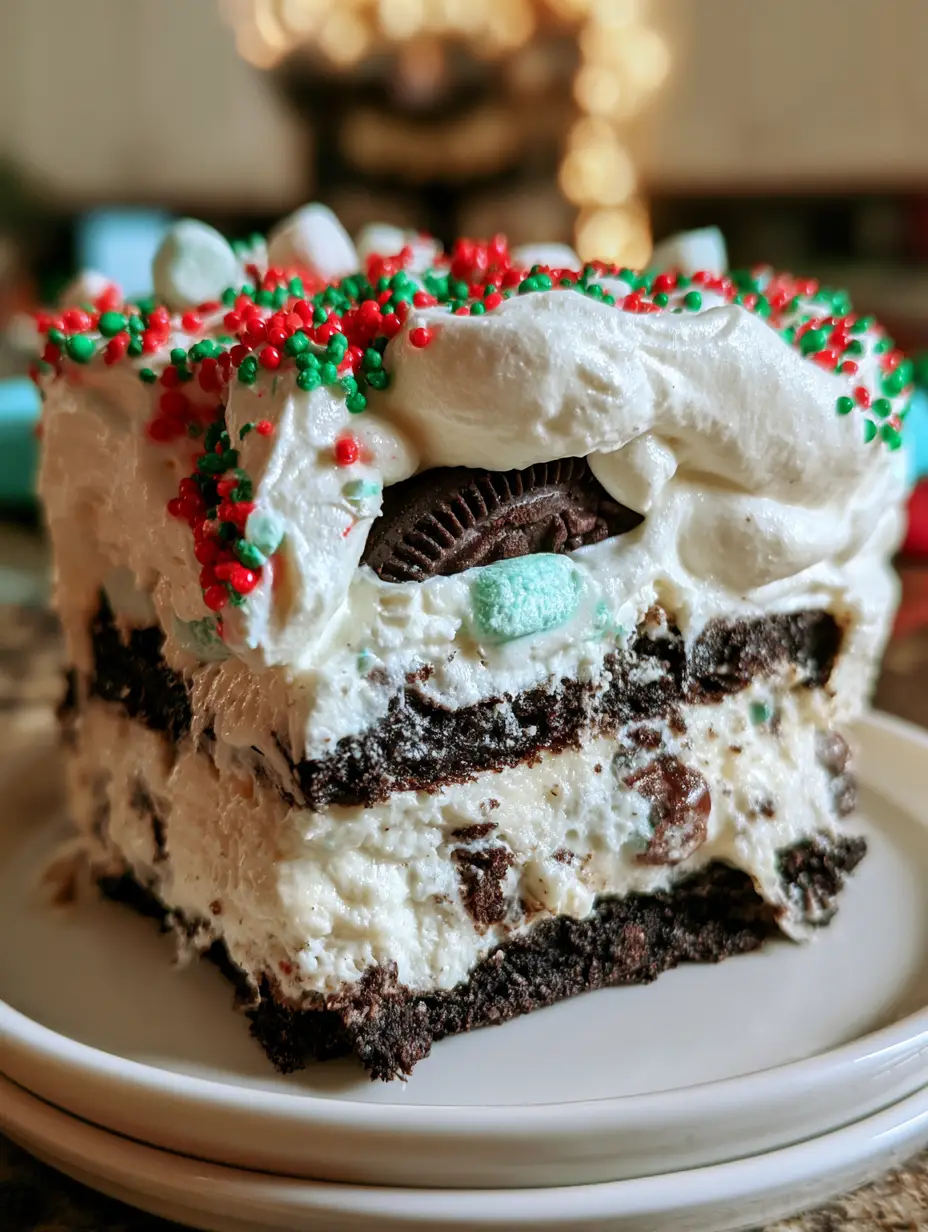
This recipe isn’t just a treat; it is a visual masterpiece designed to be the centerpiece of your dessert table. With its snowy white whipped cream, festive red and green sprinkles, and vibrant red candy melt drizzle, it captures the essence of Christmas in every bite. Whether you call it a dessert lasagna or a lush, these oreo dream bars deliver professional-grade results with zero time spent near a hot oven.
Designed for the enthusiastic home cook, this guide will walk you through the culinary science of layering, ensuring your bars stay structurally sound and visually stunning. From the dense, buttery cookie base to the fluffy marshmallow-studded topping, every element has been meticulously tested for maximum flavor and “share-ability” on social media.
Why You Will Love This Festive Oreo Dessert Lasagna
- Unmatched Texture Contrast: You get the crunch of the base, the silkiness of the cream cheese, and the airy volume of the whipped topping in one forkful.
- High-Impact Visuals: The combination of festive sprinkles, mini marshmallows, and whole cookies creates a “boutique bakery” look at home.
- Make-Ahead Friendly: These bars actually improve with time, making them the perfect stress-free option for busy holiday parties.
- No-Bake Ease: Keep your oven free for the turkey or ham while you whip up this cold-set masterpiece.
The Essential Ingredients for Perfect Oreo Dream Bars
Creating a dessert this beautiful requires a balance of pantry staples and specific decorative elements. Each ingredient serves a structural and flavor-focused purpose to ensure your oreo dream bars turn out exactly like the professional photos.
Oreo Cookies: You will need approximately 36-40 cookies (about 400g). These provide the dark chocolate base and the essential “chunks” hidden within the creamy middle layer.
Unsalted Butter: 1/2 cup (115g) of melted butter acts as the glue for your crust. It binds the cookie crumbs together, ensuring the bars don’t crumble when sliced.
Full-Fat Cream Cheese: 16 oz (450g) of softened cream cheese creates the body of the “lasagna.” Using full-fat is non-negotiable for achieving that velvety, professional mouthfeel.
Powdered Sugar: 1 cup (120g) sweetens the cream cheese layer while maintaining a smooth, grit-free texture. It dissolves much better than granulated sugar in no-bake applications.
Pure Vanilla Extract: 1 tsp (5ml) adds depth and warmth to the white layers. It helps bridge the gap between the cocoa notes and the tangy cream cheese.
Heavy Whipping Cream: 2 cups (480ml) are needed to create the voluminous, fluffy top layer. Ensure it is chilled to at least 40°F (4°C) before whipping for maximum loft.
Mini Marshmallows: 1/2 cup (50g) provides a whimsical, snowy texture to the topping. They add a soft chew that contrasts beautifully with the crispy sprinkles.
Festive Sprinkles: A mix of red and green jimmies or nonpareils (about 2 tbsp/30g) adds the necessary holiday cheer and visual pop.
Red Candy Melts: 1/4 cup (45g) of melted red wafers provides the final artistic touch. This drizzle adds a professional “finished” look to the tray.
Must-Have Equipment for Success
To achieve the clean, distinct layers seen in a classic oreo dream bars slice, you need the right tools. A standard 9×13 inch (23x33cm) glass baking dish is ideal as it allows you to see the layers from the side.
A food processor is the most efficient way to achieve the fine, sandy texture required for the crust. If you don’t have one, a heavy-duty rolling pin and a sealed freezer bag will work for manual crushing. You will also need a stand mixer or a powerful hand mixer to aerate the heavy cream and smooth out the cream cheese to prevent lumps.
Step-by-Step Instructions to Master Oreo Dream Bars
Phase 1: Engineering the Dark Chocolate Crust
Start by placing 24 Oreo cookies into your food processor. Pulse until the cookies are reduced to fine crumbs; you shouldn’t see any large white cream pieces remaining. This uniform texture is vital for a crust that holds up under the weight of the cheese layers.
Transfer the crumbs to a medium bowl and stir in the 1/2 cup (115g) of melted unsalted butter. The mixture should resemble wet sand. Press this firmly into the bottom of your 9×13 dish, using the bottom of a flat measuring cup to ensure an even, compacted surface. Place the dish in the freezer for 10-15 minutes to set.
Phase 2: The Velvety Cheesecake Middle
In a large mixing bowl, beat the softened cream cheese until it is light and airy, which usually takes about 3 minutes of high-speed mixing. Gradually add the powdered sugar and vanilla extract, scraping down the sides of the bowl to ensure every bit is incorporated. The goal is a texture that looks soft and velvety, exactly like a professional mousse.
Take 8 additional Oreo cookies and roughly chop them into large, bite-sized pieces. Gently fold these into the cream cheese mixture. This provides the “visible chocolate chunks” that make the middle layer so enticing. Spread this mixture evenly over the chilled crust, being careful not to disturb the cookie base.
Phase 3: The Voluminous Whipped Topping
In a separate chilled bowl, whip your heavy cream until stiff peaks form. If you prefer a more stable topping, you can add a tablespoon of instant vanilla pudding mix during this step, similar to the technique used in a traditional Oreo dessert lasagna.
Carefully pile the whipped cream onto the cream cheese layer. Use a spatula to create soft “peaks” and valleys rather than smoothing it perfectly flat. This “voluminous, fluffy” look is a hallmark of the oreo dream bars aesthetic. Much like festive peppermint bars, the height of the cream is what gives this dessert its “dreamy” quality.
Phase 4: Festive Finishing Touches
This is where the forensic visual accuracy comes into play. Sprinkle the red and green festive sprinkles generously over the top. Scatter the mini marshmallows across the surface, ensuring they sit nestled in the whipped cream. Take 6-8 whole Oreo cookies and press them slightly into the cream at even intervals—these serve as a guide for where to slice the bars later.
Finally, melt your red candy melts in 30-second intervals in the microwave until fluid. Using a spoon or a piping bag, drizzle the red chocolate in a zig-zag pattern across the entire tray. The contrast of the red drizzle against the white cream is stunning and mimics the elegance of colorful holiday bars.
Expert Tips for the Perfect Slice
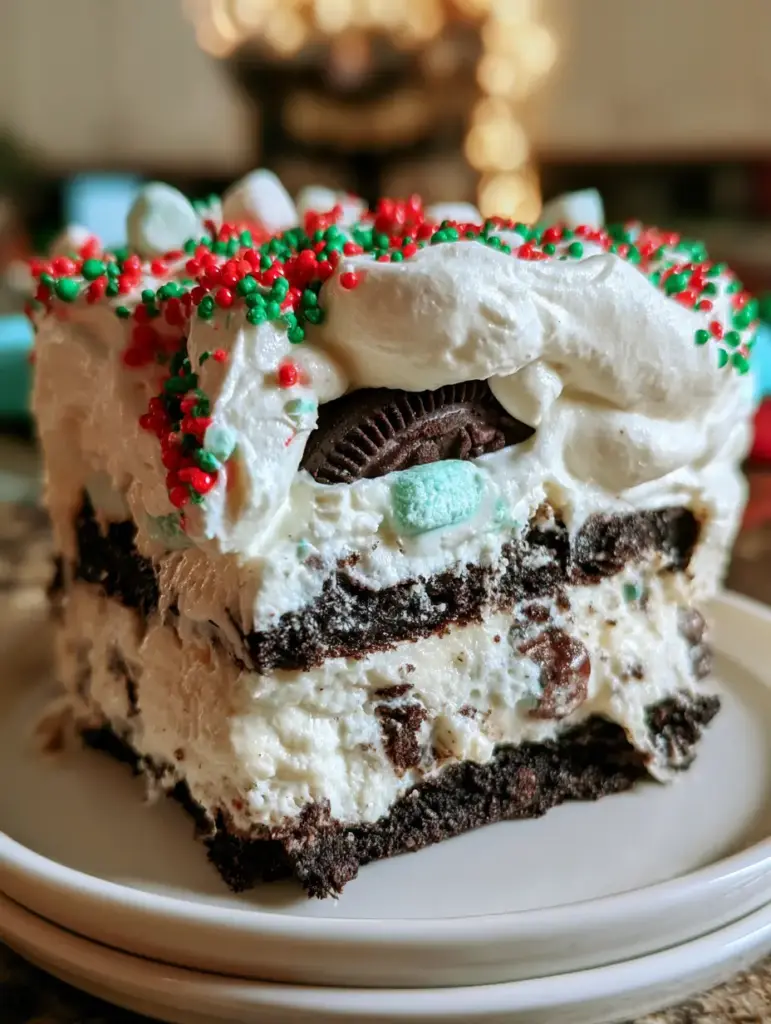
- The Chill Factor: For clean, professional-looking squares, chill the bars for at least 4 hours, or preferably overnight. This allows the fats in the butter and cream cheese to fully solidify.
- Clean Cuts: Between every single cut, wipe your knife blade with a warm, damp cloth. This prevents the white cream from smearing into the dark crust.
- Room Temp Cheese: Ensure your cream cheese is truly at room temperature. If it is even slightly cold, you will end up with tiny lumps that ruin the “velvety” texture described in the prompt.
- Stabilization: If you are serving these at a party where they will sit out for more than an hour, consider using a stabilized whipped cream or a whipped topping to ensure the voluminous layers don’t deflate.
Storage, Reheating, and Freezing
These oreo dream bars are a refrigerator-stable dessert. Store any leftovers in an airtight container or tightly covered with plastic wrap in the fridge for up to 5 days. Note that the cookies in the topping may soften slightly over time, but the flavor remains excellent.
While you can freeze these bars, the texture of the marshmallows and the whipped cream may change slightly upon thawing. If you do freeze them, wrap them in a double layer of foil and consume within 1 month. Thaw in the refrigerator for 2-3 hours before serving to maintain the structure.
What to Serve With Your Oreo Dream Bars
Because these bars are incredibly rich and decadent, they pair best with beverages that offer a bit of acidity or bitterness to cleanse the palate. A strong cup of black coffee or a dark roast espresso is the classic choice. For a kid-friendly pairing, a cold glass of milk is traditional, but a warm cup of cocoa can also work during the holidays.
If you are building a full holiday dessert spread, consider adding lighter options to balance the plate. These bars look wonderful alongside homemade Bounty bars or even a tray of pink sugar cookie bars for a varied color palette. For those who enjoy fruit-forward desserts, a side of cranberry mousse parfaits provides a tart contrast to the deep chocolate of the Oreos.
Frequently Asked Questions
Yes, simply replace the standard cookies with Gluten-Free Oreos. The rest of the ingredients are naturally gluten-free, but always check your labels on candy melts.
Absolutely! 8 oz of thawed whipped topping can be used in place of the heavy cream for a more stable, albeit less rich, result.
Yes, but you may need to reduce the amount of melted butter slightly, as the extra filling in Double Stuf cookies provides additional moisture and binding.
The key is a long chill time (at least 4 hours) and using a sharp, warm knife. Wiping the blade between every cut ensures the layers stay distinct and stable.
Lumps occur if the cream cheese is too cold. Ensure it reaches true room temperature before mixing, and always sift your powdered sugar for the smoothest texture.
The Complete Oreo Dream Bars Recipe
Oreo Dream Bars: The Ultimate No-Bake Christmas Dessert Lasagna
Ingredients
Equipment
Method
- Pulse 24 Oreos in a food processor until fine. Mix with melted butter until it resembles wet sand.
- Press the mixture into a 9x13 dish and freeze for 10 minutes to set the structure.
- Beat softened cream cheese, powdered sugar, and vanilla until smooth and velvety.
- Fold in the 8 chopped Oreos and spread the mixture over the prepared crust.
- Whip heavy cream to stiff peaks and spread over the filling in voluminous waves.
- Garnish with sprinkles, marshmallows, and whole Oreos. Drizzle with melted red candy melts.
- Refrigerate for at least 4 hours before slicing into decadent bars.
Notes
Ensure cream cheese is room temperature to avoid lumps.

Closing & Call to Action
Mastering the oreo dream bars is a surefire way to become the MVP of your holiday gathering. The combination of visual drama and classic flavor makes it a recipe that guests will ask for year after year. The dense crust and velvety middle provide a foundation of luxury, while the festive toppings ensure every slice feels like a gift.
We would love to see your holiday creations! If you make this recipe, please leave a comment below and let us know how the layers turned out. Don’t forget to follow us on Pinterest for more decadent dessert inspiration and holiday hosting tips. Share your photos and tag us—nothing makes us happier than seeing these dream bars in the wild!