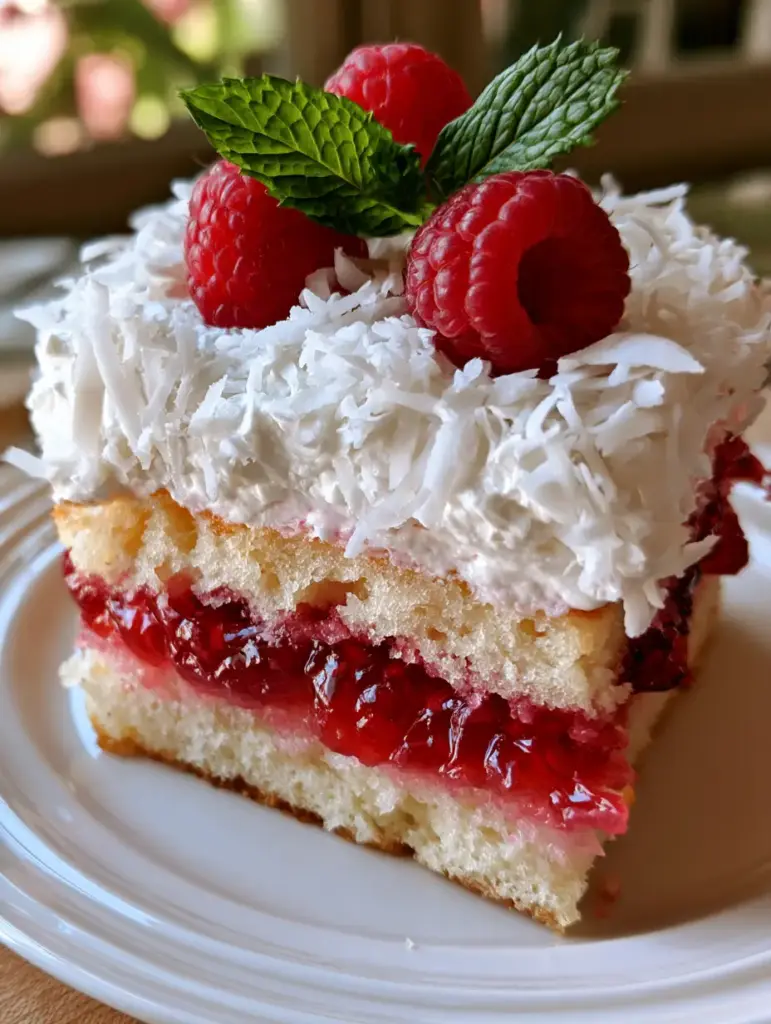
There is something undeniably nostalgic and deeply satisfying about a classic raspberry poke cake. This isn’t just a dessert; it is a vibrant, multi-textured experience that captures the essence of summer in every bite. Imagine a moist, light golden vanilla cake base, permeated with ribbons of vibrant red raspberry gelatin that create a beautiful marbled effect when sliced.
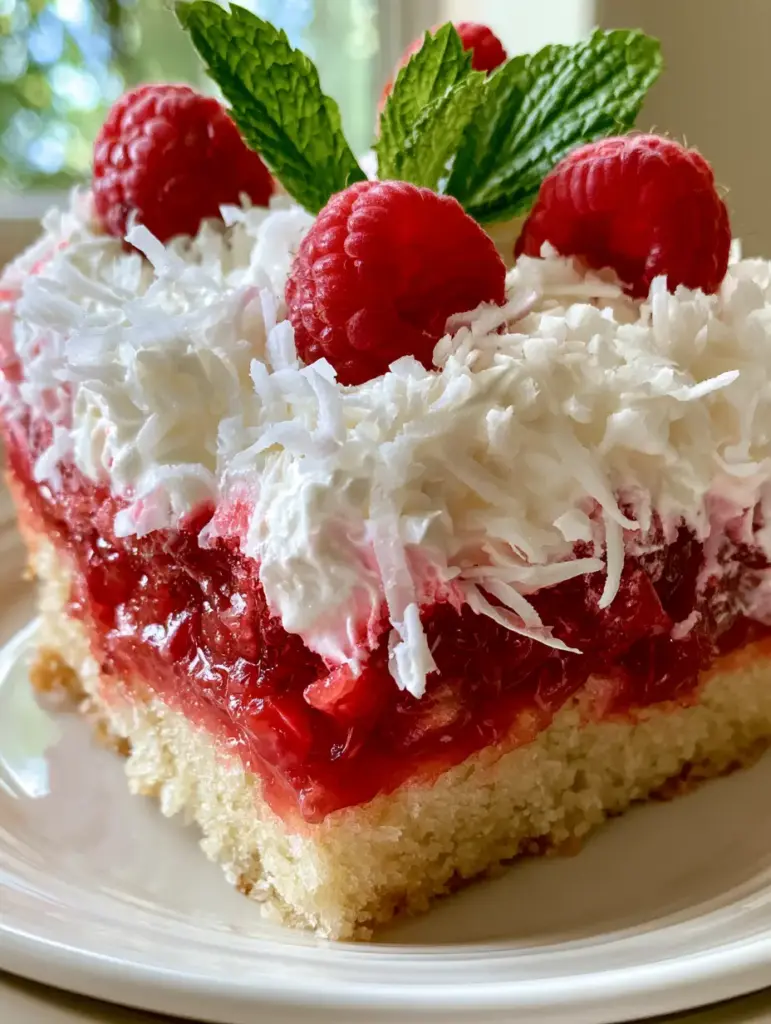
When you capture that first handheld smartphone photo of a single slice, the contrast is breathtaking. The fluffy white whipped cream sits like a cloud atop the cake, generously showered with shredded white coconut that adds a subtle crunch. The crown of fresh red raspberries and bright green mint leaves provides a pop of color that looks professional yet feels incredibly approachable for any home cook.
Whether you are serving this on an elegant white ceramic plate for a dinner party or bringing the whole pan to a neighborhood potluck, this raspberry poke cake is designed to impress. The glistening, moist appearance of the fruit and the distinct layers of cake and jelly make it a visual masterpiece. It is the kind of recipe that begs to be shared, both on the table and on your social feed.
Why This Raspberry Poke Cake is a Show-Stopping Dessert
- Vibrant Layering: The visual bridge between the golden cake and the deep red raspberry infusion creates a stunning “swirl” effect that is a hallmark of high-quality poke cakes.
- Textural Harmony: You get the softness of the sponge, the silkiness of the gelatin, the airy volume of the whipped cream, and the tropical chew of shredded coconut.
- Sensory Freshness: The use of fresh mint and whole raspberries cuts through the sweetness, providing a balanced, sophisticated flavor profile.
- Effortless Elegance: Despite its complex appearance on a white ceramic plate, the techniques used are simple enough for beginners to master with professional results.
Essentials for the Perfect Raspberry Infusion
To achieve the specific visual and structural results seen in our blueprint, every ingredient serves a dual purpose: flavor and architecture. We use foundational elements to ensure the cake doesn’t become soggy while maintaining that “glistening” moistness.
For the Vanilla Cake Base:
2 ½ cups (312g) All-Purpose Flour: This provides the structural integrity needed to hold the liquid gelatin without collapsing into mush. A medium protein content ensures a tender yet sturdy crumb.
1 ½ cups (300g) Granulated Sugar: Beyond sweetness, sugar aids in the browning process, giving us that light golden cake exterior described in the visual prompt.
1 tbsp (15g) Baking Powder: This is our primary leavening agent, creating the “fluffy” air pockets that will later be filled with raspberry goodness.
½ tsp (3g) Salt: A culinary essential that sharpens the vanilla notes and balances the tartness of the raspberries.
¾ cup (170g) Unsalted Butter, softened: Butter provides the rich, “melt-in-your-mouth” texture and a foundational flavor that oil simply cannot replicate.
1 cup (240ml) Whole Milk: The fats in whole milk contribute to the moist appearance and create a tighter, more professional crumb.
2 tsp (10ml) Pure Vanilla Extract: This provides the aromatic backbone that makes the “vanilla cake base” stand out against the fruit layers.
3 Large Eggs: Eggs act as the binder, ensuring your slice stays intact when moved to the serving plate.
For the Raspberry Filling and Topping:
6 oz (170g) Raspberry Gelatin Mix: This provides the vibrant red color and the characteristic “poke” stripes that define the dish.
1 cup (240ml) Boiling Water: Required to fully dissolve the gelatin crystals for a smooth, glistening soak.
½ cup (120ml) Cold Water: This helps temper the gelatin so it doesn’t overcook the cake crumb upon contact.
2 cups (480ml) Heavy Whipping Cream: When whipped, this creates the “fluffy white” topping that acts as the canvas for our garnishes.
¼ cup (30g) Powdered Sugar: A small amount to stabilize the cream and add a hint of sweetness.
1 cup (75g) Shredded White Coconut: The blueprint requires abundant coconut for both visual texture and a tropical flavor note.
1 pint (approx. 170g) Fresh Red Raspberries: These must be ripe and firm to achieve the “glistening” look on top of the cream.
Fresh Mint Leaves: A few bright green leaves are essential for the final color contrast against the red berries.
Tools Required for Culinary Success
To recreate the handheld smartphone photo look, you need more than just ingredients. The right tools ensure the “distinct layers” are sharp and the presentation is clean.
A 9×13 inch (23x33cm) baking pan is the standard for this recipe, ensuring the cake is the right height for soaking. You will also need a wooden spoon with a rounded handle; the diameter of the handle is perfect for creating the “holes” that allow the gelatin to seep down deep into the vanilla base.
A stand mixer or electric hand mixer is vital for achieving the “fluffy white whipped cream” texture. Finally, an offset spatula will help you smooth the cream topping perfectly flat before you begin the artful placement of the raspberries and mint.
The Step-by-Step Architecture of a Poke Cake
Crafting the Moist Vanilla Foundation
Preheat your oven to 350°F (175°C). Grease and flour your baking pan thoroughly to ensure the cake releases cleanly. In a large bowl, cream together the softened butter and granulated sugar until the mixture is pale and light, which usually takes about 3-4 minutes.
Add the eggs one at a time, beating well after each addition to maintain the emulsion. In a separate bowl, whisk the flour, baking powder, and salt. Gradually alternate adding the dry ingredients and the milk to the butter mixture, starting and ending with the flour. Stir in the vanilla extract last to preserve its volatile aromatics.
Pour the batter into the prepared pan and bake for 30-35 minutes. You are looking for a “light golden cake” appearance. A toothpick inserted into the center should come out clean or with just a few moist crumbs. Do not overbake, as we need the cake to remain absorbent.
Executing the Precision Poke and Soak
Allow the cake to cool for exactly 15 minutes. It should still be warm to the touch but not hot. Using the handle of a wooden spoon, poke holes across the entire surface of the cake, spaced about 1 inch apart. Ensure you poke about three-quarters of the way down to create those deep, vibrant red raspberry gelatin channels.
Whisk the raspberry gelatin mix with 1 cup (240ml) of boiling water until completely dissolved. Stir in the ½ cup (120ml) of cold water. Slowly and carefully pour the liquid over the cake, directing it into the holes. This is what creates the glistening, moist appearance within the crumb. Refrigerate the cake for at least 3 hours to allow the gelatin to set firmly.
Achieving the Fluffy White Topping
In a chilled bowl, beat the heavy whipping cream and powdered sugar until stiff peaks form. The cream should be airy and hold its shape. Spread this fluffy white whipped cream over the chilled cake in an even layer. If you enjoyed the texture of our luscious pistachio pineapple dream cake, you will recognize how a stabilized cream layer transforms a simple sheet cake into a gourmet dessert.
Forensic Garnishing for Visual Impact
Now, follow the visual blueprint: shower the top of the cream with the abundant white shredded coconut. The coconut should look like a light dusting of snow across the surface. Take your fresh red raspberries and place them artfully—either in rows or a rustic scatter—across the top.
Finally, tuck a few bright green mint leaves near the berries. The contrast between the red fruit, green leaves, and white coconut is what makes this cake “highly appetizing” and “unedited” in its beauty. Serve a single slice on a white ceramic plate to let the colors truly pop.
Expert Tips for the Ultimate Raspberry Poke Cake
- Temperature Control: Never pour hot gelatin over a hot-out-of-the-oven cake. The cake will become gummy. The “warm-to-the-touch” stage is the sweet spot for absorption.
- Hole Spacing: Don’t be afraid to poke plenty of holes. The more holes you have, the more “vibrant red” marbling you will see when you cut into it.
- Stabilizing the Cream: If you are serving this outdoors, consider adding a tablespoon of instant vanilla pudding mix to your whipped cream to keep it from melting. This trick also works wonders for our decadent Italian cream cake recipe.
- Berry Freshness: Wash your raspberries gently and pat them dry completely before placing them on the cream to prevent red juice from bleeding into the white topping.
Storing and Serving Suggestions
This raspberry poke cake actually improves with age as the flavors meld. Store it in the refrigerator, covered loosely with plastic wrap or a lid, for up to 3-4 days. The coconut helps keep the whipped cream from sticking to the cover.
We do not recommend freezing this cake once the whipped cream and fresh berries are added, as the textures will degrade upon thawing. However, you can freeze the “soaked” cake base (before topping) for up to a month if wrapped tightly in foil.
Perfect Pairings for a Summer Dessert Table
If you are looking to round out a dessert spread, this cake pairs beautifully with other classic treats. The tartness of the raspberry balances the richness of a decadent pecan caramel cake. If you’re hosting a brunch, try serving this alongside our savory sausage stuffed french toast rolls for a perfect sweet-and-savory balance.
For those who love fruit-forward desserts but want something with a bit more crunch, these sweet cinnamon air fryer apple fries make a fantastic side-by-side companion for a casual gathering.
Common Questions About Raspberry Poke Cake
Yes! In fact, the cake tastes better after the gelatin has had time to fully set. We recommend adding the fresh mint leaves just before serving to keep them from wilting.
While you can use frozen berries in a pinch, they tend to release excess moisture as they thaw, which can bleed into the whipped cream. For the ‘glistening’ visual result, fresh raspberries are highly recommended.
If you aren’t a fan of coconut, you can substitute it with white chocolate shavings or simply omit it. However, the coconut provides a beautiful visual contrast and texture described in our recipe blueprint.
Sogginess usually happens if the gelatin is poured while the cake is too hot, or if the cake base isn’t sturdy enough. Ensure your cake is cooled to ‘warm’ and follow the flour measurements exactly for proper structure.
The Ultimate Raspberry Poke Cake Recipe Card
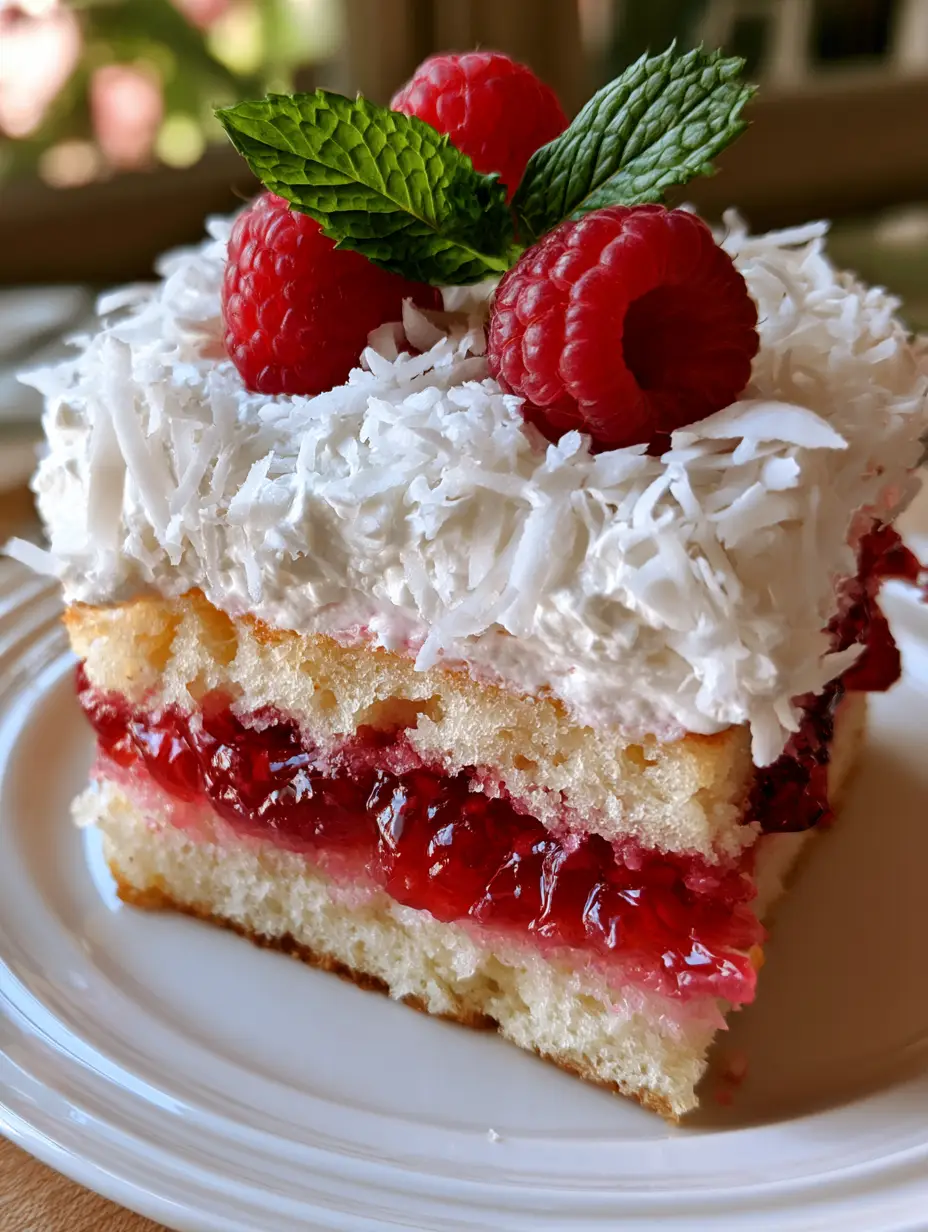
Raspberry Poke Cake with Fresh Berries and Fluffy Whipped Cream
Ingredients
Equipment
Method
- Cream butter and sugar, add eggs, then alternate dry ingredients with milk. Bake at 350°F (175°C) for 30-35 minutes until light golden.
- Cool cake for 15 minutes. Use a wooden spoon handle to poke holes every inch, 3/4 depth into the cake.
- Dissolve gelatin in boiling water, add cold water, and pour slowly into the holes. Chill for 3 hours.
- Spread whipped cream over the cake. Sprinkled with coconut and top with fresh raspberries and mint leaves.
Notes
Always use fresh mint for the best visual contrast.
Bring This Vibrant Dessert to Your Table
The raspberry poke cake is more than just a sweet treat; it is a centerpiece that brings joy to the table. With its moist vanilla base and striking red jelly swirls, it captures the perfect balance of comfort and elegance. We hope you enjoy making this as much as you enjoy eating it!
If you loved this recipe, please leave a comment below and tell us how yours turned out! Don’t forget to share your photos and tag us, or pin this recipe to your favorite dessert board on Pinterest so you can find it whenever the craving for fresh berries strikes.